![]()
Updated: 01/05/2005
Technical Addendum

Applying
the
Zone System
to Video
Discriminating motion picture cameramen and still photographers often use the zone system to insure a full tonal rendition of subject matter. When they move to video, they may feel adrift in a medium that seems to lack the familiar controls afforded by film.
Actually, video has the same options as film, but they are based in electronics. Once a film camera operator or Director of Photography learns how to use the electronic process, it actually provides more assurance of desired results than the film process. For one thing, you can instantly see your results and make on-the-spot adjustments, rather than have to wait for a few hours or a day for film "rushes."
In the case of the zone system, which
we'll concentrate on here, it's just a matter of knowing how to translate
film procedures to video procedures. 
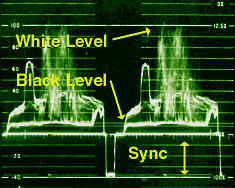
With video, you will need the help of a waveform monitor—the device shown on the right that displays video levels.
You will recall from Module 16 that a waveform monitor is calibrated in IRE units. In the visible video area they start with 7.5 for TV black and go up to 100 for TV white.
We will divide the full tonal scale into eight zones. Our goal is to get the needed tonal range that has important detail into six of them. We are generally not concerned with absolute white or absolute black, because neither should contain important detail. Even with a pure white wedding dress or a snowdrift, there is subtle detail in the form of texture, and light and shadow that keeps it from looking chalky.
Even though pure white and pure black may be a part of the picture, just as it is in the illustration below, we are primarily interested in preserving detail in zones II through VII. Note in the photo that we have both zone I and zone VIII information. (Computer monitors and monitor adjustments vary, so it's impossible to predict exactly how this photo will be rendered.)

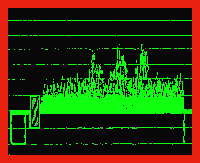
As we move to zone II, there is shadow detail that we want to preserve. If we underexpose the camera, this detail will be lost and the picture will begin to have large black areas. Note the photo below. (Although two identical fields equal to one complete video frame are typically displayed on a waveform monitor, to simplify things here we'll show just one video frame.)
 |
 |
If we go to the other extreme and overexpose the image, we end up with the result below. In this case the top of the waveform monitor is electronically clipped off, losing all detail in the bright areas. As we note in Module 16, this is one of the ways a system copes with levels that exceed the maximum allowed signal strength.
 |
 |
Now that we've seen the worst things than can happen by missing our exposure, let's zero in on how to make things right.
Although your camera's automatic exposure system will (hopefully) provide better results than either of the above photos, these automatic systems are based on average conditions and subject matter—a 17% reflectance value, which may or may not represent a scene you have in mind. This generalized setting will provide fairly decent results most of the time. However, professionals, can't rely on "most of the time" results, or "fairly decent" results. They need to know how to expertly control the contrast range to retain all of the necessary subject details.
Although automatic exposure control may not result
in video as bad as either of the two ![]() examples
above, there may still be a loss of detail in either end of the gray scale.
In HDTV production the careful manual setting of video levels is always
preferred over automatic exposure systems.
examples
above, there may still be a loss of detail in either end of the gray scale.
In HDTV production the careful manual setting of video levels is always
preferred over automatic exposure systems.
Scenes that have large dark areas, or bright areas that exceed about 5% to the total picture area can skew automatic exposure to a point of destroying accurate tonal rendering. Examples would be a well-lit subject on a dark background, or a daylight interior setting with windows in the background, white or near-white walls, or an exterior shot with patches of sky in the background. In our sample photo, the large area of water that reflects the sky would result in significant underexposure with automatic systems.
By looking at the waveform pattern of the normal image above, the waveform monitor will display the brightness range of the scene. The table below shows how the various zones translate into IRE values.
Zone |
IRE Units |
|
I |
7.5 or less |
Absolute Black |
II |
7.5-20 |
Black with details |
III |
20 |
Dark gray, showing good texture |
IV |
40 |
Medium-dark gray |
V |
55 |
Middle gray |
VI |
80 |
Average Caucasian skin tones, light gray |
VII |
100 |
Highlights with detail |
VIII |
100-120 |
Absolute white |
Camera levels should be adjusted so that critical whites peak at about 100. The blanking or black level then needs to be set at about 7.5. (Camera setups procedures differ, and we won't try to cover them here.) The graphed information on the waveform monitor is displayed left-to-right to match the area across the video fields.
Keep in mind that both absolute white and absolute black should contain no detail, and can, therefore, be allowed run off the ends of the scale a bit—generally a bit above 100 and a bit below 7.5. Since these two settings may vary a bit with the production facility, it's best to check. Caucasian skin tones will normally fall in the zone VI range; but, this, of course, depends on the nationality, time spent in the sun, etc.
Caucasian women will normally have lighter skin tones then Caucasian men. This difference can be so striking that, if they will be standing next to each, some form of makeup or gamma control may be necessary. (Gamma affects the size of the steps in the gray scale. Be aware that the term has slightly different meanings in video and in film.) Most digital cameras have various settings for the tonal rendition of skin. Some have the ability to select skin tones from a scene and smooth out wrinkles and skin imperfections.
In our sample scene we stretched (lowered
the contrast in) the black areas in order to retain desired detail under
the water in the foreground of the picture.  Without this adjustment, all of the water,
plus much of the shadow detail in the buildings, would have dropped into
the solid black range and have been lost.
We weren't interested in any detail in the small areas of snow, so we let it go above 100 and be clipped.
For critical applications, a well-aligned video monitor should be used along with the waveform monitor to insure the results you want. Steps for setting up a video monitor can be found here.
The zone system can be especially important
in a scene like the one on the left, where we have important details in
the shadow  areas.
(Note man standing in the background.)
This scene is particularly difficult because we have a brightly-lit actress in a scene containing large shadow areas where we need to preserve detail.
Although the surface of the bed is brightly lit, we need to keep it within zone VII. At the same time we need to keep the shadow areas in zone II or above.
Once those familiar with film techniques become familiar with video procedures, they should have the same control over video images as they have with film. In fact, the newest generation of video cameras can mimic the tonal renditions of not only films in general, but the gamma curves of specific film stocks.
Some additional film vs. video information can be found here.
To Home Page
© 2005, All Rights Reserved
![]()