|
Module 14 |
Updated: 07/04/2005 |
|
Lenses: Some
If each lens element reflected only 5% of the light hitting its surfacenot at all unusual for a piece of glassyou would end up with no light at all going to the camerawhich sort of defeats the purpose of the lens. But, there's a solution. To reduce the problem of internal
reflections the surfaces of lens elements are coated with a micro-thin, anti-reflection
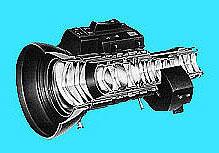
coating. This This means that in a zoom lens, such as the one shown here, the front and back of each of the 20+ glass elements will have anti-reflection coatings. Although lens coatings are much more resilient than they used to be, they are still relatively easy to permanently scratch. Once a lens is badly scratched, its sharpness is diminished and the image contrast is reduced. A scratched lens is quite costly to repair; in fact, it's generally less expensive to replace the lens than to try to repair it. Since it's easy for an object to come in contact with a camera lens, remember to always use a lens cap when the camera is being transportedand, in fact, any time the camera is not being used. A lens cap not only guards against the lens being scratched, but also keeps dirt and fingerprints off of the lens, which reduce sharpness and contrast. Some lens caps are made of white translucent plastic and are designed to replace the white cards used to white balance a camera. By putting the capped lens in the dominant light source and pushing the white balance button, the camera will white balance on the color of the light coming through the lens cap. Although this is a quick way to color balance, it's not as accurate as zooming in on a carefully positioned white card.
|

 lens
coating typically gives the glass elements a light blue appearance and greatly reduces
the amount of light lost due to surface reflections.
lens
coating typically gives the glass elements a light blue appearance and greatly reduces
the amount of light lost due to surface reflections.|
Cleaning Lenses Small quantities of dust on a lens will not appreciably affect image quality. Fingerprints or oily smudges are a different matter. If not promptly removed, the acids in fingerprints can permanently etch themselves into a lens coating. However, each time the lens is cleaned there is the risk that tiny abrasive particles picked up by the cleaning tissue will create microscopic scratches in the coating. For this reason a lens should not be routinely cleanedthe way you regularly wash your hands, for example. A lens should only be cleaned when you see dirt or dust on the lens surface.
If this doesn't remove all of the dirt, you can take the next step. Dampen a lens tissue with lens cleaner and very gently rub the lens in a circular motion. While very gently rubbing, turn or roll the tissue slightly so that any dirt will not be rubbed over the lens surface. Never drip lens cleaner directly on a lens. It can easily seep
behind lens elements and create a major problem. And don't clean a lens with silicon-treated
lens tissues or the silicon-impregnated cloths commonly sold for cleaning eyeglasses.
The residue may permanently discolor the coating. Condensation On the Lens Condensation or raindrops on the lens can distort or even totally obscure an image. When a camera is taken from a cool area into warm air, the lens frequently fogs up. This can be a real problem in cool climates when camera equipment is brought inside after being outside in the cold for some time. Even though moisture may be wiped off the lens, the lens may continue to fog up until its temperature equals the surrounding air. Condensation can also take place within a camcorder and cause major problems. For this reason, most camcorders have a dew indicator that detects moisture or condensation within the unit and shuts it down until the moisture has evaporated. A message such as "DEW" will typically be displayed in the viewfinder. To control the effects of condensation, you should allow 30
minutes or so warm-up time whenever you bring a camcorder from a cold to a warm
environment. Rain Jackets Although use of a video camera in
rain, snow, or wind-driven In an emergency, a plastic garbage bag can be used. Simply cut out a hole for the lens and use a rubber band to hold the plastic around the lens barrel. You will also need to cut out a hole for the viewfinder. Another rubber band can hold the plastic tightly around this area. If you can work the camera's controls through the plastic bag,
you can keep most of the camera sealed off. Remember that most camcorders are full
of delicate moving parts, and all it takes is a bit of dirt, sand, or moisture in
the wrong place to put the unit out of commission.
In doing studio work you often have a set sequence of shots that you use on a regular basis. The wide-shots, two-shots, and one-shots in a newscast are a good example. Shot boxes are electronic lens controls
that can memorize a series of zoom lens positions, complete with zoom speeds and
focus settings. Note the series of white buttons shown here. Each button can be
programmed for a particular shot. This approach can add speed and consistency to
studio work. Image Stabilizers
The original device was called an image stabilizer and was based on a gyroscopically controlled mechanism that resisted short, fast movements by shifting lens elements in the opposite direction. Since that time, new and simpler approaches have been devised. The simplest, digital
stabilization, electronically "floats" an active As the camera moves, the smaller frame shifts within the larger target area in an attempt to compensate for the movement. If, for example, the camera moves slightly and, we'll assume, unintentionally, to the right, the digital frame (illustrated here) will electronically move in the opposite direction, canceling the movement on the camera's target. Many consumer-grade camcorders use this approach. Although this electronic image stabilization approach has seen some major technical improvements in recent years, by reducing the usable target image area, image resolution and clarity are still to some degree sacrificed. Optical image stabilization is preferred by professional videographers. One approach incorporates two parallel, floating optical surfaces within the lens that act as a kind of flexible prism. When the camera moves, the movement is electronically detected and a voltage is generated that changes the configuration of the prism. This alters the angle of light passing through the prism and shifts the image on the target in the opposite direction. Since the full target image is used, there is no loss of image quality. With all types of stabilizers the camera operator must learn to "compensate for the compensation." When the camera is (intentionally) panned from left-to-right there is typically a short delay as the camera initially tries to compensate for the move. Once beyond a certain point, the stabilizer can't compensate for the movement and the image starts to move as intended. However, at the end of the pan the image may continue to move for a moment until the system comes back into balance. This means that the camera operator may have to end the pan a moment early and allow the camera to complete the move. Once such things are taken into consideration, stabilization devices (which now use sophisticated fiber optic servo devices) can be relied upon to reduce or eliminate undesirable camera movement, the type of movement associated with such things as vibration from a helicopter, or the motion associated with a moving vehicle.
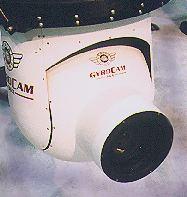
The GyroCam helicopter mount shown
on the left above not only compensates for vibration, but can also be completely
controlled (the pan, tilt, zoom, iris, etc.) from within the helicopter. This is
the type of device used to follow car chases from the air and to follow fugitives
on the ground. Lens Mounts With many types of video camerasespecially consumer-type camerasthe zoom lens is permanently mounted to the camera body and can't be removed. However, some video cameras allow you to change lenses to meet specific needs. With these, cameras lenses can be removed either by unscrewing them (in the case of C-mount lenses) or by turning a locking ring (in the case of the bayonet mounts). With cameras using C-mounts the lenses are screwed into a finely threaded cylinder about 25 mm in diameter. The C-mount was the first type of lens mount used with small video cameras because it takes advantage of a wide array of 16mm motion picture camera lenses. Although at least one type of camcorder uses C-mount lenses, this mount is primarily used by industrial type video cameras, including closed circuit surveillance cameras. Most professional video cameras use some type of bayonet mount. This mount is easier to use than the C-mount because the lens can be removed from the camera without going through many rotations. Professional video cameras with a 2/3-inch or 1/2-inch chip (imaging device) use a B4 lens mount. Consumer camcorders with smaller chips are generally not designed for interchangeable lenses. The Canon XLO1 camera is the exception here. It uses a bayonet mounting system that accepts Canon's extensive array of 35mm still camera lenses.
With all this as a background, we can classify the lenses used on video cameras into three categories:
|
 To clean a lens, first remove any surface dirt
by blowing it off with an ear syringe or by brushing it off with a clean camel's
hair (an extremely soft) brush.
To clean a lens, first remove any surface dirt
by blowing it off with an ear syringe or by brushing it off with a clean camel's
hair (an extremely soft) brush.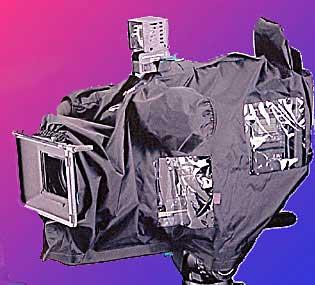 sand
or dust is definitely discouraged, news stories often have to be shot under such
conditions. Camera "rain jackets," such as the one shown on the right, are available
that cover all but the very end of the camera lens.
sand
or dust is definitely discouraged, news stories often have to be shot under such
conditions. Camera "rain jackets," such as the one shown on the right, are available
that cover all but the very end of the camera lens. Shot
Boxes
Shot
Boxes In 1962, a type of lens housing was introduced
that can compensate (within limits) for camera vibration and unintentional camera
movement.
In 1962, a type of lens housing was introduced
that can compensate (within limits) for camera vibration and unintentional camera
movement. picture frame within a slightly larger target area.