|
Module 20 |
Updated: 07/05/2005 |
|
The Camera
We are gradually sneaking
up on the operation of the total video camera. But, before we can really use one
like a professional, there are a few more things we need to cover, starting with- Viewfinder Types The viewfinder of a camcorder
can be a CRT, tube-type (like those used in Unlike studio cameras that typically use at least seven-inch displays, the viewfinders for camcorders must be much smaller. They typically use a miniature video screen viewed through a magnifying eye piece. |

 the
original TV sets), or a flat panel display similar to those in laptop computers.
the
original TV sets), or a flat panel display similar to those in laptop computers.|
With cameras that use side-mounted
viewfinders, the viewfinder can often be flipped from one side of the camera to
the other for operators who prefer to use their left or right eyes. When the viewfinder
is flipped in this way the image ends up being upside-down-unless a reversal switch
is flipped. (This also explains why an image might inexplicably be upside down when
you first look in a viewfinder.) Holding your eye to a standard viewfinder for a long period of time can be quite fatiguing. Cameras employing flat panel viewfinders (which you can view from a distance) can help. This type of viewfinder (pictured here) is also an aid in shooting at very low or high angles. Flat panel viewfinders can also be used to compose shots that you, yourself, want to be in. You can simply mount the camera on a tripod and (on many cameras) turn the viewfinder around so you can see it. The main disadvantage of the flat panel display is that the image loses contrast and brightness when viewed in bright light. This can make the camera hard to focus. Once you get used to their operation,
viewfinder goggles that resemble virtual For critical, professional work the best "viewfinder" is an
external monitor-preferably, a bright, high-resolution color monitor. Even though
this type of standalone monitor requires extra power and limits your mobility, it's
the only accurate way of checking subtle lighting effects and critically evaluating
things such as depth of field. Camera Safe Areas Because of overscanning and other
types of image loss between the camera and the home receiver, an area around the
sides of the TV camera image is cut off before being seen. To compensate for this, directors must assume that about ten percent of the viewfinder picture may not be visible on home receivers. This area (framed by the red lines in the photo) is referred to by various names including safe area and essential area. All written material should be confined to an "even safer" area, the safe title area (the area inside the blue frame).
As we noted in Module 9, HDTV/DTV uses a 16:9 aspect ratio, and standard TV (SDTV) a 4:3 aspect ratio. Most producers are now shooting their shows in the 16:9 digital
format. But, since most home viewers still have sets with 4:3 aspect ratios, productions
need to be shot so they can be used in either format. As we've previously noted, the term shoot-and-protect
refers to the process of shooting scenes in 16:9 while "protecting" the 4:3 area-making
sure that it still contains all the essential information. To do this a 4:3 grid
(shown in red here) is superimposed over the 16:9 viewfinder image. Adjusting the Viewfinder Image Because the image in a
camera's viewfinder is actually the image from a miniature TV screen, it's
subject to Adjusting the viewfinder image does not affect the video coming from the camera itself. But adjustments to the camera video will affect the viewfinder image. Obviously, viewfinders need to accurately represent the nature and quality of the video coming from the camera. To make sure that the contrast and brightness of the viewfinder
are set correctly, the camera's built-in, electronically generated color bars (if
they are available in the camera you are using) can be switched on and checked in
the viewfinder. The viewfinder brightness and contrast controls can then be adjusted
until a full, continuous If the camera doesn't have a built-in test pattern, the quality
of the camera video should first be verified with the help of a test pattern
and a reliable external video monitor before the viewfinder controls are adjusted.
Checking Viewfinder Accuracy The next step is to check viewfinder alignment to see that the area shown exactly corresponds to what the camera is "seeing." Although flat panel viewfinders normally remain stable over time, the frame area accuracy of a tube-type (CRT) camera viewfinder can drift to a point of not accurately showing the output of the camera. It's relatively easy to check on this. First, a video monitor has to be found that has itself been perfectly aligned with the help of a test pattern. The output of the camera in question is then hooked up to the monitor and the camera is focused on a test pattern so that the outermost edges of the test pattern just fill the viewfinder image. Any discrepancy between the viewfinder image and the monitor image should then be obvious. Viewfinder alignment may have to be adjusted with the help of an engineer or technician. Occasionally the electrical focus will also drift out of adjustment on a tube-type viewfinder. This will make optical focusing difficult until it is corrected, generally with the help of a test pattern and screwdriver-equipped engineer. (Since there are very high voltages within CRT housings, these adjustments should be left to someone familiar with these matters.) Wearing glasses while using a side-mounted
CRT camera viewfinder can present problems-especially in seeing all four corners
of the image at the same time. Therefore, many side-mounted eyepiece-type viewfinders
have a control in the eyepiece to correct for variations in eyesight. This is referred
to as diopter correction. If this isn't built in, eyepieces
can be purchased that can eliminate the need for many types of eyeglasses while
using the camera. Status Indicators-Viewfinder Variety To help you keep track of everything you need to know while shooting, video camera manufacturers have added an array of status indicators to viewfinders. (And you thought only things like designer jeans were status indicators!) First, there are miniature colored lights around the edges of
the video image. Red, yellow, and green are common colors. Sometimes they even blink
to get your attention. Next, are the indicators that are superimposed on the viewfinder video. Boxes, bars, and lines are common configurations. Some of the viewfinder messages may be superimposed over the image in plain English (or the language of your choice). For example, "Tape remaining: 2 min." Finally, some camcorders have small speakers built into the sides that announce (again, in the language of your choice) such things as "low battery," or "tape remaining: five minutes." Since every manufacturer uses a slightly different approach, you need to study the camera guide to determine what a camera is trying to tell you. The time spent becoming familiar with the meaning of these indicators will more than pay for itself in avoiding disappointments and failures. Viewfinder status indicators can include the following:
In the next module we'll take up camera prompters.
|

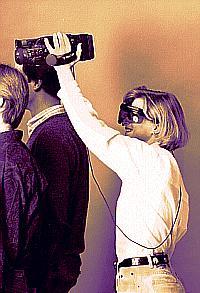 reality goggles allow even greater flexibility. This type of viewfinder can be used
to supplement a standard side-mounted viewfinder. Since the viewfinder is connected
to the camera by a long cable, you can easily hold the camera over your head, as
shown here, place it flat on the ground, or even shoot backwards with the camera
mounted on your shoulder.
reality goggles allow even greater flexibility. This type of viewfinder can be used
to supplement a standard side-mounted viewfinder. Since the viewfinder is connected
to the camera by a long cable, you can easily hold the camera over your head, as
shown here, place it flat on the ground, or even shoot backwards with the camera
mounted on your shoulder.

 brightness
and contrast variations. In addition, with tube-type viewfinders there may also
be an electrical focus problem and the occasional lack of proper image centering.
brightness
and contrast variations. In addition, with tube-type viewfinders there may also
be an electrical focus problem and the occasional lack of proper image centering.