|
Setting Up Lights
In the studio, lights are
commonly attached to a lighting  grid
with C-clamps and safety chains. On-location lights are normally mounted on floor
stands. A portable lighting kit is shown on the right. grid
with C-clamps and safety chains. On-location lights are normally mounted on floor
stands. A portable lighting kit is shown on the right.
Key and fill lights are generally easy to position; stands are
just placed at 45-degrees on either side of the camera at an appropriate height.
On locations, back lights can't be hung from a lighting grid
as they can in a studio, so other solutions must be considered.
A back light may be clipped to the top of a bookcase, an exposed
rafter, or any convenient, out-of-view anchoring point. If this option isn't available,
you might consider constructing a lighting goal post out of black plastic
(PVC) pipe over the background area (outside of the camera's view) and clipping
the light to the center. One or more back lights can be hung from the middle and
the wires can be taped to the pipe with black electrical tape.
Lighting Boards
Typically, dozens of lights
are required for each studio setting. In an elaborate dramatic production involving
several sets (all of which may have to be ready for use at the same time), there
can even be  several
hundred lights involved. several
hundred lights involved.
Being able to control all of these lights—switch them on and
off, dim them to required settings on cue, etc.—can be a daunting process.
Although simple lighting boards such
as the one pictured on the left can handle basic studio productions, major dramatic
productions require a computer-based system.
Typically, a software program displays
each of the ceiling grid connectors on the computer screen. (Note the photo
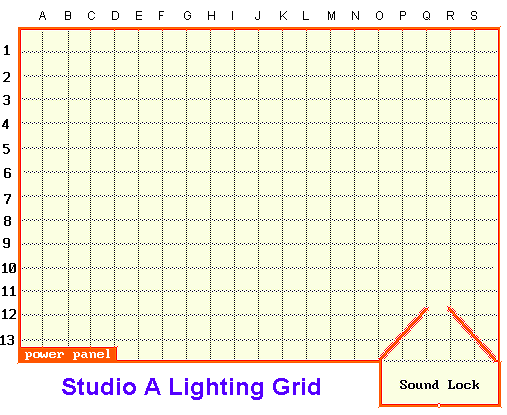
on the right.) You will recall from an  earlier
illustration that any grid lighting connector can be indicated by a letter and number
combination. After a lighting instrument is plugged into one of these connectors,
power settings can be programmed into the computer. earlier
illustration that any grid lighting connector can be indicated by a letter and number
combination. After a lighting instrument is plugged into one of these connectors,
power settings can be programmed into the computer.
Once this is done, the
lights can be assigned to groups and all controlled together. For example,
switching an interior scene from a daylight to a night effect may involve simultaneously
dropping the level of the background and fill lights, and eliminating several key
lights.
Once all the lights are programmed, scene and time-of-day changes
require only a few mouse clicks to activate preprogrammed settings.
On-Location Power Issues
In setting up on-location
lighting it's often necessary to figure out how many lamps a fuse or circuit-breaker
can handle.
Although the standard house current voltage in the United States
and many other countries is between 110 and 120, in doing calculations it's common
to assume a voltage of 100. This not only makes it easier to do calculations, it
automatically provides a safety factor. By assuming a voltage of 100, the following
formula can be used:
watts divided by 100 = amps
(The standard voltage in your country may vary, and the base
of these calculations will have to change accordingly.) Assuming 100 volts,
and using this formula, a 500-watt lamp would draw 5 amps. A 20-amp fuse or breaker
could handle up to 2,000 watts; a 30-amp fuse up to 3,000 watts, etc.
When setting up multiple
lights the total wattage is simply added together. If a 1,000-watt key light, a
500-watt fill, a 500-watt back light and a 500-watt background light were all plugged
into the same circuit, the combined amperage (which comes to 25 amps) would blow
a standard 20-amp fuse or breaker. (Actually, it might take a few minutes to heat
up the breaker enough to trip it—just long enough to get a good start on taping
a segment!)
To keep from overloading a fuse or circuit breaker, it's often
necessary to run extension cords from separately fused circuits—possibly from an
adjoining room. But if these extension cords are not made of heavy gauge wire they
can lower voltage to lamps, resulting in drops in color temperature.
Since power (total wattage) in some locations is limited, you
may have no choice but to bring in an electrician to run a temporary, high-amperage
line from the main fuse box. In remote areas a generator truck or a portable, gas-powered
generator may have to be considered.
Film vs. Typical TV Lighting
Compared to dramatic film
scenes, video (especially sitcoms, game shows, etc.) often looks a bit flat and
dimensionless. Although some people conclude from this that video is inferior to
film, the reason actually centers primarily on differences in lighting.
Since film is almost always shot in single camera style,
lighting angles and intensities (not to mention audio, make-up etc.) are optimized
for this one camera angle and distance.
A typical television sitcom involves three or four cameras spanning
almost 160-degrees. Since the director needs to be able to cut to any camera at
any time, the lighting must be able to hold up throughout this entire range.
To avoid the possibility of having major shadow areas, the safest
way of lighting this type of production is to light relatively flat (high-key) using
multiple key lights to cover every camera angle. This means that dimension and form
are lost, the things that can make film scenes seem much more dramatic.
But, if the time and budget allow, video can also be shot single
camera, film-style. When this is done, video—and especially digital/HDTV—can achieve
the same dramatic quality we're used to seeing in film.
The Art Of Lighting
In describing the basic
techniques for lighting in these modules, we've covered approaches that will provide
good results for most studio and field work. At the same time, no attempt can be
made to cover complex lighting needs. Numerous books have been written on this subject
alone.
The lighting required for sophisticated, multiple-camera dramatic
productions requires the skill and artistic ability of an experienced lighting director.
At this level of sophistication lighting moves into the realm of a true art form.
In the next section we'll turn to the audio part of the TV medium.

|


 and the lights can be programmed into a lighting control system to be remotely switched
on and off or dimmed.
  grid
with C-clamps and safety chains. On-location lights are normally mounted on floor
stands. A portable lighting kit is shown on the right.
 several
hundred lights involved.
 earlier
illustration that any grid lighting connector can be indicated by a letter and number
combination. After a lighting instrument is plugged into one of these connectors,
power settings can be programmed into the computer.