Module 60


Updated: 08/30/2005

Remember, you may have to reload a page if an illustration does not initially appear.

Module 60


Video Switchers

and Special Effects


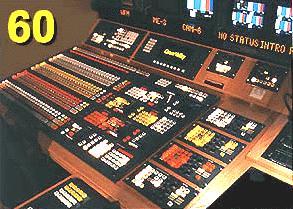
Although video switchers like the one pictured here look impossibly complex, once you understand some basics, they aren't nearly as intimidating.

In this module we'll trace operations that are common to most switchers, both hardware based and software based. We'll start with a very basic switcher configuration.

 Fader bars

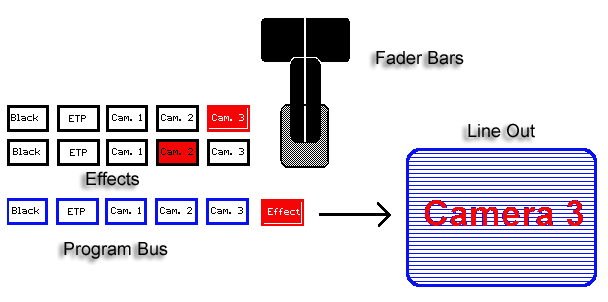
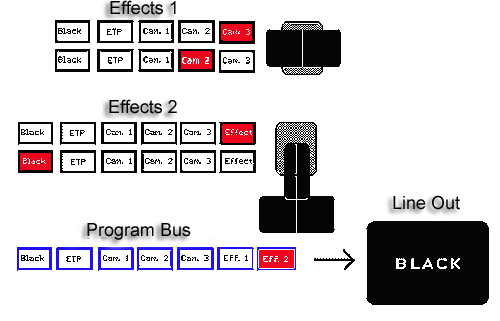
Each button represents a video source-even "black," which includes the technical parts of the video signal necessary to produce stable black. The bottom row of buttons (outlined in blue) is the program bus or direct-take bus. Any button pressed on this row sends that video source directly to line out, the final feed being broadcast or recorded.

The easiest way to instantly cut from one video source to another is simply to select it ("punch it up") on the program bus. The program bus generally handles more than 90% of video switching.

But, what if you want to dissolve (fade) from one camera to another, or fade to black?

For this you need to move to the top two rows of buttons referred to as effects, or the mix/effect bus. From here, with the help of the fader bars, you can create rudimentary special effects.

fader bars 2 When the fader bars are in the top position as shown here, any video source punched up on the top row of buttons is sent to the effects button on the program bus. (To see this clearly, you may want to refer back to the larger illustration above.) The buttons that have been selected are shown in red.

In this case, camera 3 was selected on the effects bus, so that's the camera that will be sent down to the program bus. Since the effects bus has been selected on the program bus, its signal will then be sent out and be displayed on to the line out video monitor. Put another way, the fader bars point toward the top row of buttons on the effects bus, and camera 3 has been selected on this bus, and, since we have the output of "effects" selected on the program bus, that's what we are going to end up seeing.

If we were to move the fader bars down to the lower position, the video source selected on the lower row of buttons on the effects bus (in this case camera #2) would then be sent to the program bus. If the "Effects" button were selected here, Camera #2 would be put on the air.

During the process of moving the fader bars from the fader bars 3 top to the bottom, we see a dissolve (and overlapping transition) from camera #3 to camera #2.

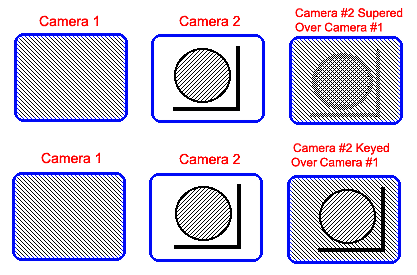
If we stop the fader bars midway between the move from top to bottom, we would see both sources of video at the same time-we would be superimposing one camera over the other.

Although this used to be the way we displayed titles, credits, etc., on the screen, today we use an electronic keying process.  As illustrated below, a key represents a much cleaner and sharper effect.

key and super  

effects bus  

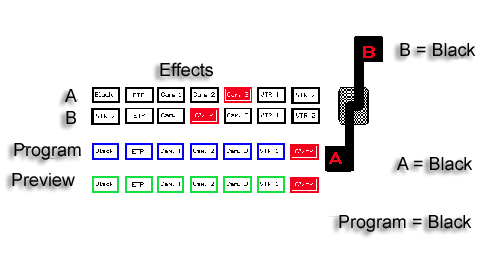
First, note in the drawing above that the fader bars have been split-each one being at the "0" (no video, or black) position. If we were to move fader bar "A" to the top position we would put camera 3 on the air; if we were move fader bar "B" to the bottom position we would put camera 2 on the air. But we don't want to do both of these things at the same time, because it would result in two, full-strength video signals being sent out at the same time.

Next, note the extra row of buttons (outlined in green) marked "preview," just below the program bus. With the preview bus we can set up and check an effect on a special preview monitor prior to switching it up on the program bus. Without being able to preview and adjust video sources before putting them on the air, we might end up with some unpleasant surprises.

To see (preview) an effect, we first punch up effects on the preview bus. When we get the effect we want on the effects bus, we can cut directly to it by punching up effects on the program bus.

Some switchers, like the one shown in the photo at the beginning of this module, have multiple effects banks. A simple version is shown below.


effects bus

Using what you know about switchers at this point, can you figure out how black arrived on the screen in the drawing above?

If you moved the fader bars on Effects #2 to the up position, you would make a transition from black to whatever was on Effects #1. In this case it would be Camera 2 superimposed over Camera 3.

Finally, let's add some real bells and whistles. The top row of buttons wipes in this drawing represents various types of wipes.
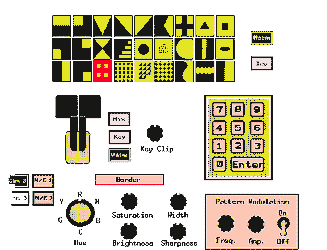
Yellow on the buttons represents one video source, black another source. Additional patterns-some switchers have hundreds-can be selected by entering numbers on the keypad.

If wipe is selected on the switcher, the button pushed (indicated in red in this drawing) shows the moving pattern (controlled by the fader bars) that would be involved in the transition from one video source to the other.

A border along the edges of the wipe pattern-a transition border-can be used, and its hue, brightness, sharpness, width, and color saturation selected. To add even more variety, the edge of the wipe can also be modulated (made to move) with the pattern modulation controls.

The key clip knob controls the video level of the source you are going to key into background video. This is adjusted visually on the preview monitor.

Downstream keyers, which are often used to key in such things as opening titles and closing credits, are external (downstream from) the studio switcherbasic switcher. The advantage of a downstream keyer is that it doesn't require the use a switcher's effects bank for keying. This means that the bank stays free to be used for other things.
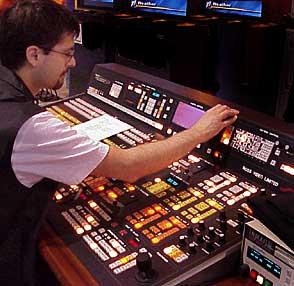
The switcher shown at the left incorporates versions of all of the features we've discussed, plus a computer display that adds even more options.

Although switcher configurations differ, they all center around the same basic concepts.

Later, we'll talk about software-based switchers and special effect units that are based on a desktop computer.


Chroma Key

The type of key we've been discussing so far is referred to as luminance key because the keying effect is based on the brightness or luminance of the video that you are keying in. But, as we saw when we discussed virtual reality sets, it's also possible to base keying on color (chroma).

In chroma key a particular color is selected for removal and another video source is substituted in its place. This type of keying is commonly done during newscasts where a graphic is inserted behind a newscaster, or a weather map is keyed in behind the weather person.  

chroma key 1


chroma key 2

chroma key 3

The photo on the right was created by keying the model into the beach scene. As we saw in Module 26, chroma key is now used to key in virtual reality sets behind talent.

Although any color can be used in chroma key, royal blue and a saturated green are the most commonly used. Most of the special effects we seen on television today are done with chroma key.


Software-Based Switchers and Effects

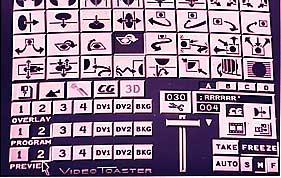
software-basedMost software-based switchers use the hardware-based switcher that we've discussed as a graphical model. Note the familiar fader bars and the various banks of buttons shown on the computer screen on the left. In this case, instead of pushing buttons, you click on the buttons with a mouse.

Software based systems can be easily and regularly upgraded when new software is written-an advantage you don't have to the same degree with hardware-based equipment. With most software-based systems it's also possible to go beyond basic switching and create such things as 3-D illustrations and animated effects.


        Interactive Crossword    

       TO NEXT MODULE       Search Site        Video Projects        Revision Information         
            Issues Forum        Comment or Problem          Associated Readings        Bibliography           
 
   Index for Modules          To Home Page         Tell a Friend       Tests/Crosswords/Matching      

© 1996 - 2005, All Rights Reserved.
Use limited to direct, unmodified access from CyberCollege® or the InternetCampus®
.