Module 12 |
|
F-Stops and Creative
Cats and owls can see in dim light better than we can, in part because the lenses of their eyes allow in more light. We could say that the speed of the lenses in their eyes is "faster" than the lens speed of our eyes. Lens speed is defined as the maximum amount of light that can go through the lens and end up on the target. At the same time, it may not be desirable to always transmit the maximum amount of light through the lens. For reasons to be explained later we need a way of governing or controlling the amount of light going through a lens. Like the pupil of an eye that automatically adjusts to varying light levels, camera lenses have an iris that controls the amount of light that can go through the lens. Most of us know that under very low light conditions the iris (pupil) of our eyes opens up almost completely to allow in the maximum amount of light. Conversely, in bright sunlight the pupil contracts in an effort to avoid overloading the light-sensitive rods and cones in the back of our eyes.
In the same way, the amount of light falling on the light-sensitive target of a TV camera must be controlled with the aid of an iris in the middle of the lens (shown above on the left). Too much light and the picture will become overexposed and washed out; too little, and detail in the darker areas of the picture will be lost. Although an iris can be smoothly adjusted from a very small opening to the point of being wide open, certain specific points throughout this range are marked in terms of levels of light transmission. These numerical points are called f-stops. T The "f" stands for the factor involved. F-stop numbers are derived from the ratio between the lens opening and the lens focal length. If you are into formulas, it's f-stop equals focal length divided by the size of the lens opening. f-stop = focal length / lens opening Thus, when a lens iris is set at f/8, the diameter of the lens opening must be multiplied by 8 to arrive at the lens focal length; when it is set at f/2.0, the diameter of the iris opening must be multiplied by 2 to arrive at the focal length. This bit of math explains the strange set of numbers used for f-stop designations, and the fact that the smaller the f-stop number the more light the lens transmits. Let me repeat that: the smaller the f-stop number the more light the lens transmits. The following illustrates this relationship. 1.4, 2.0, 2.8, 4.0, 5.6, 8, 11, 16, 22 <=== more light ~ less light ==> Occasionally we see f-stops not illustrated
above. Examples would be f/1.2, f/3.5 and f/4.5. These are midpoint settings between
whole f-stops, and on some lenses they represent the maximum aperture (speed) of
the lens. The figure at the right compares the size of a series of f-stops. We've noted that the speed of a lens is equal to its maximum (wide-open) f-stop. In the drawing shown above, f/l.4 would be the speed of the lens represented. When an iris setting is opened up one f-stop (from f/22 to f/16 in the drawing above, for example), it would represent a 100 percent increase in the light going through the lens. Conversely, if the lens is stopped down one stop (from f/16 to f/22, for example,) the light is cut by 50 percent. Put another way, when you open up one stop you double the light; when you stop down one stop you halve the amount of light going through the lens. And so how are you supposed to use this knowledge? Once this f-stop range is understood, it will be obvious which
way a lens iris should be adjusted to compensate for a picture that is either too
light or too dark-which, as it turns out, is a major issue in video quality. Cameras with automatic exposure controls use a small electric motor to automatically open or close the iris in response to varying light conditions. On professional cameras the f-stop settings are visible on the lens barrel and sometimes in the camera's viewfinder display. (Note the f-stop settings in this photo.) On many consumer cameras the numbers aren't shown and exposure adjustments are automatic-which, depending on circumstances, may or may not set the iris at the best setting. (Manufacturers don't want to trouble unsophisticated consumers with such things as f-stops, but professionals definitely need to know about such things.) As we will see, for savvy videographers who are stuck with this
automatic feature on a camera, there are various ways to "influence" the automatic
exposure. Not only can this result in better image exposure, but it can
provide control over such things as depth of field (to be discussed below). A typical situation where automatic exposure adjustment will not provide the best video is illustrated here. When automatic circuitry is used, bright backgrounds, lights, and windows in a scene will generally result in dark (underexposed) video and muted colors. This problem repeatedly shows up in amateur videos and in the work of beginning videography students. These modules cover several solutions to this problem, including the use of the camera's backlight control. |


|
Depth of Field Depth of field is defined as the range of distance in front of the camera that is in sharp focus. Theoretically, if a camera is focused at a specific distance, only objects at that exact distance will be completely sharp and objects in front of and behind that point will be, to varying degrees, blurry. In actual fact, areas in front of and behind the point of focus may be acceptably sharp. The term acceptably sharp is subjective. A picture doesn't just abruptly become unacceptably blurry at a certain point in front of or behind the point of focus. The transition from sharp to out of focus is gradual. For practical purposes the limits of sharpness are reached when
details become objectionably indistinct (blurry). This will vary according
to the medium. What is acceptably sharp in standard NTSC television (SDTV) will
be much greater than what is acceptable in HDTV. In the latter case, the superior
clarity of the medium will more readily reveal sharpness problems. Depth of Field and F-stops The larger the f-stop number (the smaller the iris opening), the greater the depth of field will be. Therefore, the depth of field of a lens used at f/11 will be greater than when the same lens is used at f/5.6; and depth of field at f/5.6 will be greater than at f/2.8.
Depth of Field and Focal Length Although depth of field also appears to be related to lens focal length, it's only an apparent relationship. As long as the same image size is maintained on the target, all lenses of similar design when set at a specific f-stop will have about the same depth of field, regardless of focal length. What's that again?
If you were to enlarge a section of image area out of the wide-angle shot exactly equal to the image area created by the telephoto lens, you would find the depth of field would be the same. There is a lot of misinformation about this. Some textbooks even have it wrong. But to prove the point a leading photo magazine tested this with lenses of similar design and different focal lengths. The principle as stated above was confirmed. Why all the fuss about something like this? Because an understanding of this can save you from unpleasant surprises in video production. Let's pursue this a bit. Wide-angle lenses (or zoom lenses used at wide-angle positions) are good at hiding a lack of sharpness, so they are a good choice when accurate focus is a problem. Of course, when you use a wide-angle lens setting you may need to move much closer to subject matter to keep the same-sized image. But by moving in close, you've lost the sharpness advantage you seemingly gained by using the wide-angle lens in the first place. With a telephoto lens or zoom lens used at a telephoto setting, focus has to be much more precise. In fact, when zoomed in fully (at maximum focal length) the area of acceptable sharpness may be less than a few inches (20mm, or so), especially if the lens is used at a wide aperture (low f-stop number). This can represent either a major problem or a creative tool. In the latter case it can force a viewer to concentrate on a specific object or area of a scene. (Our eyes tend to avoid areas of a picture that are not clear, and they are drawn to areas that are sharply focused.)
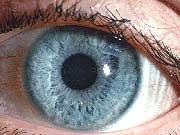
The following discussions assume you can manually focus a lens, or you can turn off the autofocus feature (to be discussed below). It might seem that focusing a lens is a simple process of just "getting things clear." True, but a few things complicate the issue. It's probably obvious at this point that a zoom lens should be focused after first zooming into a close shot (using maximum focal length). Since focusing errors will be the most obvious at this point, focusing will be easier and more accurate. Once focused, the lens can be zoomed back to whatever focal length is needed. If the scene contains a person, you
will want to focus on the catchlight or Note the extreme closeup woman's eye in the camera viewfinder in the photo on the right. If you don't zoom in and focus, but try to focus while holding a wide shot, you will inevitably find when you later zoom in that the picture will "go out of focus." (Remember our discussion: the focus error that wasn't noticeable before will suddenly be greatly magnified and obvious.) Complicating the focus issue is the fact that HDTV cameras will readily reveal focus errors. This level of focus of accuracy needed for high-resolution video isn't easy to achieve with small camcorder viewfinders. One solution is to loop the video output of the HDTV camera
through a high-resolution TV monitor and use this image in focusing.
Another is to use some type of electro-mechanical focus assist. We'll
discuss this when we talk about auto-focus lenses. One of the important creative tools available to a videographer or cinematographer is focus-making sure certain some things are in focus and others aren't. This ends up being an effective way of directing attention toward things that are important and away from things that can be distracting and need to be de-emphasized or hidden.
Consider the scene in the left. By throwing the building and the newspaper out of focus, the woman stands out clearly in the photo and is not lost in a confusion of distracting elements. If the scene is brightly lit, as this one is, you may have to use a high video camera shutter speed or even a light reducing neutral density filter to reduce the amount of light going through the lens. To compensate for either of these actions, the iris will have to be opened up to let in more light. This will minimize depth of field and create the selective focus effect.
In video production a moving subject may quickly move outside the limits of depth of field unless the lens can be quickly refocused. Professionals know which way to turn the focus control to keep a moving subject in sharp focus. (Nonprofessionals may end up throwing a slightly blurry image totally out of focus for a few seconds when they first turn the focus adjustment the wrong way.) The technique of follow focus is used to subtly refocus the camera to accommodate subject movement. This is not to be confused with -. Rack focus is similar to selective focus, only the camera operator changes focus to shift viewer attention from one part of the scene to another.
Note how rack focus is used in this
series of photos. In the first photo on the left above we see the woman (in focus)
sleeping. When the phone rings the focus shifts to the phone, (on the right, above). As she picks up the phone and starts to talk, the focus shifts (racks) back again to bring her into focus. To use this technique you have to rehearse your focus shifts so you can manually rotate the lens focus control from one predetermined point to another. Some videographers temporarily mark the points on the lens barrel with a grease pencil. After locking down the camera on a tripod, they can then shift from one focus point to another as needed.
With most camcorders you can turn autofocus on and off. For the following discussion we're assuming autofocus is turned on. Autofocus can be a help in following moving subjects. However, you will encounter problems unless you fully understand how it works. Most autofocus devices assume that the area you want in sharp
focus is in the center of the picture. Let's refer back to the rack focus sequence discussed above. Since the area you want to focus on does not remain in the center of the frame, autofocus would not be useful. Note that in the photo below the center area is correctly focused (thanks to autofocus) but that the main subject is blurry. Of course, the goal in this case was to have it the other way around. To make this scene work with autofocus you would have Some camcorders allow you to center the subject matter in the autofocus zone and then lock the autofocus on this area. You can then can reframe the scene for the best composition. One camcorder attempts to track eye movement in the viewfinder and shift focus accordingly. If you were looking at the woman, the camera would focus on her; but as soon as you look at the building in the background, the camera will shift focus to this point. Autofocus systems have other weaknesses. Most can be fooled by reflections, and flat areas with no detail. Most autofocus systems also have trouble determining accurate focus when you are shooting through glass, wire fences, etc. And, finally, autofocus devices (especially under low light) can keep readjusting or searching for focus as you shoot. This can be quite distracting. For all of these reasons professional videographers typically turn off autofocus, if it even exists on their particular video camera and rely on their own focusing techniques. The only exception might be in a chaotic situation where there is no time to manually try to keep moving subject matter in focus.
Focus errors that aren't discernible in SDTV (standard definition TV) can be obvious in the images from high resolution digital cameras. Further complicating the issue is that HDTV lenses are often used at wide f-stops that minimize depth of field (good for selective focus, but bad for keeping subjects in focus), and, as we've noted, small HDTV camcorder viewfinders make critical focusing difficult. Although the traditional auto-focus approaches can be a problem for the reasons we've outlined above, some lens manufacturers are experimenting with electronic "focus assist" approaches for HDTV lenses. It's a bit too early to tell how practical they might be in day-to-day HDTV production.
Most zoom lenses have a macro setting that enables the lens to attain sharp focus on an object only a few inches or even a few millimeters from the front of the lens. Although lenses differ, to reach the macro position on many zoom lenses a button or lever on the barrel of the lens is pushed to allow the zoom adjustment to travel beyond its normal stopping point.
Many newer lenses are called continuous focus lenses. These are internal focus lenses that can be smoothly and continuously adjusted from infinity to a few inches without manually having to shift the lens into a macro mode. Videographers often forget about the macro capability, but it offers many dramatic possibilities. For example, a flower, stamp, or a portion of a drawing or snapshot can be made to fill the TV screen. A tripod or camera mount is a "must" in using the macro setting. Since depth of field extends only a few millimeters at this super-close range, focus is extremely critical.
|
 Except for extreme closeups, depth of field extends approximately 1/3 of the way
in front of the point of focus and 2/3rds behind it. The drawing on the right illustrates
this range.
Except for extreme closeups, depth of field extends approximately 1/3 of the way
in front of the point of focus and 2/3rds behind it. The drawing on the right illustrates
this range.  gleam
in one eye. There are two reasons for this: the person's eyes are normally the first
place we look in viewing a scene, and this small, bright spot is easy to focus on.
gleam
in one eye. There are two reasons for this: the person's eyes are normally the first
place we look in viewing a scene, and this small, bright spot is easy to focus on. The term selective focus is used
to describe the process of using limited depth of field to intentionally throw areas
of the picture out of focus. This technique is widely used in film and is associated
with the so-called "film look" that many people find desirable.
The term selective focus is used
to describe the process of using limited depth of field to intentionally throw areas
of the picture out of focus. This technique is widely used in film and is associated
with the so-called "film look" that many people find desirable.


 The
autofocus area (the area that the camera will automatically focus on) is represented
by the green area in this photo.
The
autofocus area (the area that the camera will automatically focus on) is represented
by the green area in this photo. to
pan or tilt the camera to bring the main subject into the autofocus area. This would
change the composition in a way that you may find undesirable.
to
pan or tilt the camera to bring the main subject into the autofocus area. This would
change the composition in a way that you may find undesirable.