|
Module 18 |
Updated: 07/20/2005: |
|
Color Balancing Cameras
Except for possibly Martians
(which at this point are of Consumer-type cameras typically have automatic color balance or white balance circuitry that continuously monitors the video and attempts to keep colors true.
In white balancing a camera a sensor
on or within the camera averages As with all automatic circuitry, however, automatic white balance is based on certain assumptions, which may or may not be valid. In this case of automatic white balance circuitry the assumption is made that when all colors and light sources in the scene are averaged the result will be a neutral (colorless) gray or white (i.e., all colors will "zero out.") Variations from this state are "corrected" by the white balance circuitry. A problem arises if there are strong, dominant colors in the scene, or (with some cameras) if the camera and the subject matter are illuminated by different light sources. Automatic white balance circuitry will work reasonably well under the proper conditions, and for the typical videographer with simple equipment this is certainly better than nothing. But, in the professional realm where consistent color balance
is expected, automatic circuitry
|

 unknown
color), having green skin tones signals a technical problem.
unknown
color), having green skin tones signals a technical problem. the light within the scene and automatically adjusts the camera's internal color
balance to zero-out any generalized color bias.
the light within the scene and automatically adjusts the camera's internal color
balance to zero-out any generalized color bias.|
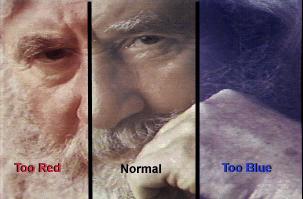
White Balancing On a White Card Since we know from our earlier discussion that red, green, and blue must be present in certain proportions to create white, it's relatively easy to white balance a professional camera to produce accurate color. With the camera zoomed in full frame on a pure white card, the operator can push a white balance button and the camera's chroma channels will be automatically adjusted to produce pure white. The camera in effect says, "Okay, if you say that's white I'll balance my electronics so that it will be white." Focus is not critical, but the card must be placed full frame
within the dominant light source of the scene. After white balancing your camera, pay particular attention to skin tones. This illustration shows color balance that is too reddish, normal, and too blue (if your computer monitor is correctly adjusted to show these differences). Whenever the dominant light source in a scene changes in any way, professional cameras must again be white balanced. Going from sunlight to shadow will necessitate white balancing the camera again, as will moving from outside light to inside light. When shooting outside even the passing of a few hours will result in a slight color shift in illumination. If you do not white or color balance your camera you risk having
colors in general (and skin tones in particular) change from scene to scene.This
will be particularly bothersome during editing when you attempt to intercut scenes
that won't match, and flesh tones annoyingly change with every edit.
In an effort to compensate for the colors presented as "white,"
the camera's white balance circuitry will push the camera's color balance toward
the complement (opposite) of whatever color is in the card. Note the different effect in these two photos. Although white balance can be electronically altered in postproduction, starting out with proper color balance at the camera is always best. Otherwise, it may not be possible to make scenes match in the postproduction process. The process of skewing camera color balance is sometimes used in productions to create certain effects. For example, in the award-winning film, Traffic, director Steven Soderbergh gave different locations specific color tones. Scenes in Washington, D.C. were given cold blue tones, and the scenes in the San Diego area were warm with gold overtones. Often, we see commercials skewed strongly toward blue or yellow-gold. As we will note in an upcoming module on composition, colors can suggest moods.
Professional video cameras also have black level and black balance adjustments. These are typically set by capping the lens (so that no light enters) and allowing automatic circuitry to appropriately balance the three colors for optimum black. This automatically establishes the video level for black.
Color balancing a single camera is relatively easy, especially since minor problems can often be fixed in postproduction. The problem comes in when you have to match multiple cameras-either in the studio or in the field. If you don't get everything just right, there may be a noticeable (and annoying) shift in color, brightness, contrast, or sharpness as you switch from one camera to another. Studio camera setup adjustments are controlled by the camera's internal digital signal processor (DSP). Some of the newer studio (and some field) cameras are equipped to use a "smart card." This card, which is about the size of a credit card, records all of the parameters on the first camera that you (carefully) set up. By inserting this card into successive cameras, they are automatically adjusted to conform to that camera's parameters. Sometimes it's necessary to store these settings for use at a later time or even to send them to another location where another crew is doing segments for the same production. In this case the camera settings can be stored on a floppy disk, or even sent electronically via the Internet. Camera To arrive at proper skin tones, a mannequin, a large color photo, or a "real, live person" should be a part of the scene. You should strive for identical skin tones between cameras. (Note in this comparison that the camera on the right has too much magenta.) If the split screen approach isn't available, you can quickly switch from one camera to another while viewing the results on a single, high-quality monitor. By manipulating the gamma curve (gray scale response) of the camera's digital signal processor or camera control unit it's possible to achieve the look that motion picture cameramen can achieve through the selection of different film stocks (types of film). You can also create sophisticated film effects, such as fogging, push or pull processing (over or under developing the film), and various filtering effects. However, unlike the case of film, you can immediately see the effect. Studio engineers also make use of
a central CCU, CCU or DSP adjustments include iris, which controls the video gain or brightness, pedestal, which controls the black level, the subcarrier phase or SC control, which is similar to the hue control on your TV, and the gamma curve, or the relative response to the various tones from white to black. A more in-depth look at the various camera settings can be found
Even though you can quickly notice color changes between cameras, color is quite subjective. In fact, when it comes to judging color, the human eye can be easily fooled. To explain part of this issue, we'll look at the two primary standards of illumination: sunlight and incandescent light. Sunlight contains a roughly equal mixture of all colors of light. The color of light is measured in Kelvin (K) degrees. On the Kelvin scale the lower the color temperature the redder the light is, and, as you might assume, the higher the color temperature, the bluer the color is. Compared to sunlight, which has a color temperature of about
5,500K, the light from a standard 100-watt light bulb is only about 2,800K. The
light from the standard portable lights used in video field production measures
3,200K. (The color temperature of light will be discussed in more detail in the
chapter on lighting.) For now, we can see this difference by taking a look at the photo on the right. The woman is lit on the right side by sunlight and from the left side by standard indoor (incandescent) light. Through a process called approximate color consistency, the human eye can automatically adjust to color temperature changes in the 2,800 to 5,500K range. (Since daylight color temperature varies, depending on location, time of day, etc., the standard daylight color temperature is listed as being between 5,600 or 6,000K.) If you look at a white piece of paper in sunlight, you should have no trouble verifying that it is white. When you take the same piece of white paper inside under the illumination of a normal incandescent light, it still looks white. By any scientific measure, however, the paper seen under a standard light bulb is now reflecting much more yellow light. A yellow (2,800 to 3,200K) light falling on a white object creates a yellowish object. But, by knowing the paper is white, your mind says, "I know that the paper is white." And so (through approximate color consistency) you unconsciously adjust your internal color balance to make the paper seem white. In so doing you are able to shift all of the other colors slightly so you also perceive them in their proper perspective. Although we make such color corrections for "real-world scenes" around us, we tend not to make them when viewing television or color photos. In the latter case, we generally have a color standard within our view (sunlight, an artificial light source, or whatever) that influences our perception. Since we know that human color perception
is quite subjective, it's crucial that we rely on some objective, scientific measure
or standard so that video equipment can be accurately and consistently
color balanced. That measuring instrument, which was introduced earlier, is the
vectorscope. Good Color vs. Real Color You might assume that television viewers want to see colors reproduced as accurately and faithfully as possible. Studies have shown, however, that color preferences lean toward exaggeration. Viewers, especially in the United States, prefer to see skin tones "healthier" than they actually are, as well as grass greener, and the sky bluer. In terms of the vectorscope, this preference does not mean that hues are inaccurate, only that they are stronger and more saturated. Color saturation preferences differ in different countries.
|
 You
can also "lie to the camera" during the white balancing process to create interesting
effects. A warm-red color bias in a scene can be created by white balancing the
camera on a blue card; a blue effect (below) results from color balancing on a yellow
card.
You
can also "lie to the camera" during the white balancing process to create interesting
effects. A warm-red color bias in a scene can be created by white balancing the
camera on a blue card; a blue effect (below) results from color balancing on a yellow
card.
 color
match can be checked by focusing all cameras on the same scene and splitting the
picture with one camera on one side of the screen and the cameras you are comparing
(adjusting) on the other.
color
match can be checked by focusing all cameras on the same scene and splitting the
picture with one camera on one side of the screen and the cameras you are comparing
(adjusting) on the other. (camera control unit) or DSP (digital signal processor),
where all of the studio cameras can be controlled and adjusted at a central
location. (CCUs predated today's digital cameras that are controlled by a DSP.)
(camera control unit) or DSP (digital signal processor),
where all of the studio cameras can be controlled and adjusted at a central
location. (CCUs predated today's digital cameras that are controlled by a DSP.)