|
Module 29 |
Updated: 07/30/2005 |
|
Light Intensity
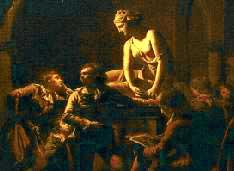
The third and last lighting variable is intensity. As we will see, the control of light intensity (or quantity) represents a major variable in dramatic production. For example, in the photo above the inside and outside illumination levels have to be carefully balanced to keep one from overpowering the other and spoiling the effect. Note how the different color temperatures (blue for moonlight, reddish for interior light) are also important to the effect. Although these things are easy to see in the photo, in an actual setting the eye ends up being a poor judge of both relative intensity and color temperature. For this we need the tools discussed in this module. Light intensity (quantity) is measured in foot-candles (candela) in the United States, or in lux in most other countries. Even in the United States "lux" seems to be replacing "foot-candles." As we've noted, a foot-candle equals about 10.74 lux (or, for a rough conversion, multiply foot-candles by 10 to get lux). To provide some points of reference:
Studio and Field Light Levels Although most TV cameras need at least 1000 lux (about 90 FC) of light to produce good quality video in the middle of the lens f-stop range, many can produce acceptable pictures under a few foot-candles of light. When color was first introduced in TV studios, 300 foot-candles (more than 3,000 lux) of light were required. As newer color cameras were introduced, this level kept dropping. Today, many on-location shoots are done with as little as 30 foot-candles (about 300 lux) of light. The latest generation of cameras can produce good quality video under less than one foot-candle (less than 10 lux) of light. Part of the motivation for using less light on locations lies in limiting depth of field and creating a "film look" by using wide f-stops. Some DPs (directors of photography) keep their on-location camera lenses at their widest f-stop to maximize this effect. Whereas in the studio you may want to use a mid-range f-stop to keep foregrounds and backgrounds in focus, on location and in dramatic production a selective focus effect is generally preferredespecially in close-ups and medium close-ups. Although low light coupled with wide f-stops make maintaining
sharp focus difficult, Note in this scene that without selective focus the woman and the goat would almost disappear into the background clutter. With today's sensitive cameras achieving this effect may mean you will have to use a neutral density filter to cut down the light going through the lens and thus force a wider f-stop.
|

 especially
in HDTV, this maximizes selective focus and eliminates the "everything in
focus" effect that some people object to in video.
especially
in HDTV, this maximizes selective focus and eliminates the "everything in
focus" effect that some people object to in video.|
Light Meters Light meters are used to measure light intensity. As we will see, being able to establish rather exact intensities for the various lights is important for professional video work. Uneven light around a scene will cause variations in video levels. Major lighting intensity differences can result in dark or even washed out skin tones. But it's possible to walk around a set with an incident light meter (discussed below) and quickly find dark or "hot" areas where lighting needs to be adjusted.
As we've noted, our eyes are drawn to light areas in a scene. Therefore, you can use light to emphasize the scene's center of interest and downplay secondary or potentially distracting elements. (Note illustration above.) Before you can use relative intensities creatively (and avoid intensity related problems) you need to be able to accurately measure light intensity. Since the eye is a rather unreliable judge in setting up lighting, we should either use a light meter or a keen eye and a high-quality color monitor. Although the latter may be preferred for making final adjustments, when lights are first being put into place it's much faster to use a light meter. There are two types of meters: reflected and incident.
A reflected light meter measures the amount of light being reflected from (off of) the main subject matter in a scene. This is the type of built-in light measurement system used in most still cameras. Because a reflected light meter assumes that all subject matter
reflects 18 percent of the light falling on ita so-called average sceneit can
be easily fooled by nonstandard subject matter. This is why the auto-iris or auto-exposure
devices in video cameras can get you into trouble. The accuracy of reflected light readings can be improved by using a spot meter (shown on the right). Spot meters are a type of reflected light meter that can measure light within a one- to five-degree angle of viewsort of like looking at things with a strong set of binoculars. In a studio setting, for example, you can stand where the cameras will be and take readings off of all of the important subject matter in the scene. If light readings between different elements in a scene are greater than five f-stops, the optimum contrast ratio has been exceeded and you will end up with some of the problems we discussed in the modules on maintaining video quality. Contrast ratios can be reduced either by throwing more light on the dark areas or by reducing light intensity on bright areas. The use of a meter is especially important in professional HDTV production, which is more technically demanding that SDTV.
Whereas a reflected light
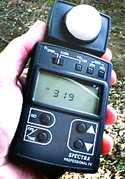
meter is valuable in determining To get an accurate reading in the studio with this type of meter you must point it directly at the light you are measuring while standing in the position of the talent. Some incident-type meters, such as the one shown here, read directly in foot-candles or lux, others require a conversion scale. Some light meters, such
as the one shown below on the right, can be used both as reflected light meters
(including spot meters) and incident meters. Often, you have to shoot video under very low light. News and documentary work and some of the network reality shows that rely on existing light are good examples. Today's professional video cameras are very sensitive to light, but in checking out a location, and before you take the time to set up all your equipment, you may want to make sure your camera can "make good pictures." If you use a meter for this purpose, you first have to know
how sensitive your camera is in terms of an exposure index (EI/ISO/ASA sensitivity).
We noted In video, color temperature meters aren't used nearly as much as light meters because cameras can be white-balanced to automatically accommodate different light sources. But, in creating an intentional difference between light sources, as in the case of the photo at the beginning of this module, knowing the color temperatures of light sources is important. Gels (colored filters) can be used in front of lights to change their color. We'll discuss the creative use of color in lights in a later module.
Of course, it does little good to know how to measure the brightness of lights if we can't control their brightness. There are several ways of doing this.
As the distance between a light source and the subject increases, the light is spread out over a larger area and the intensity decreases. Put more precisely, the intensity of light from an unfocused light source, such as the ones illustrated below, decreases according to the inverse-square law. We'll leave precise FC/lux calculations to the mathematicians and illustrate this concept by showing the intensity of a light bulb at different distances from a subject.
To use another example, let's say when a light is 3 meters (10 feet) away from a subject you find that there's 4000 lux of light on your subject. If you then double the light-to-subject distance to 6 meters (20 feet), you will end up with only about 1/4 the original light, or 1000 lux. This exact relationship does not hold with focused types of lights, such as Fresnels and spotlights, and lighting instruments that have highly polished reflectors. Even so, by keeping this general concept in mind you will be able to vary the intensities of various lights to arrive at approximate lighting ratios. This concept proves particularly useful in setting up lights on locations. In these situations altering light intensities becomes a matter of just moving the lighting stands closer or farther away from subjects.
Another way to control the intensity of light is with scrims, which resemble a frame of finely-woven screen wire. By using a single or double thickness scrim over a light, the light's intensity can be cut 30 to 60 percent.
Many lighting instruments can be focused. This also influences intensity. By using a lever or a crank, the beam of these lights can be pinned down and concentrated over a narrow area, or flooded out to cover a larger area.
Lastly, brightness can be reduced in incandescent lights by reducing the voltage to the lamps with dimmers. Unfortunately, this also affects color temperature. A rough rule of thumb is that for every one-volt drop in the voltage to an incandescent light, the color temperature drops by 10K. Since the human eye can detect a 200K color shift in the 2,000-4,000K. range, this means that a studio light can only be dimmed by about 20 percent (in relation to the other lights) without being noticed.
|
 There
is another reason for being able to accurately measure light on a set. By subtly
manipulating the brightness in the primary and secondary areas of a scene, you can
achieve a sophisticated means of visual control.
There
is another reason for being able to accurately measure light on a set. By subtly
manipulating the brightness in the primary and secondary areas of a scene, you can
achieve a sophisticated means of visual control.
 contrast
(brightness) ratios in a scene, an incident light meter (shown
here) can tell you how bright the light falling on a scene is. Instead of measuring
the amount of light reflected from subject matter, incident meters measure
the amount of light falling on the subject.
contrast
(brightness) ratios in a scene, an incident light meter (shown
here) can tell you how bright the light falling on a scene is. Instead of measuring
the amount of light reflected from subject matter, incident meters measure
the amount of light falling on the subject.
 in
the opening section that sometimes it's important to use color temperature to achieve
creative effects. There are color temperature metersone
is shown on the leftthat provide a readout of the dominant color temperature of
a light.
in
the opening section that sometimes it's important to use color temperature to achieve
creative effects. There are color temperature metersone
is shown on the leftthat provide a readout of the dominant color temperature of
a light.