|
Module 32 |
Updated: 07/30/2005 |
|
The Fill,
We've noted that the key light establishes the dimension, form, and surface detail of subject matter. Although the remaining lights have less important roles, they are nevertheless critical in creating an acceptable lighting effect. The key light by itself whether it's the
sun in a clear sky or a focused quartz light in the studio produces distracting
shadows. (We'll see some examples a little later.) The purpose of the
fill light is to partially (but not entirely) fill in the shadows created
by the horizontal and vertical angles of the key light. |

|
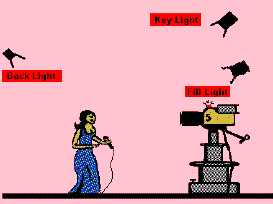
The Fill Light
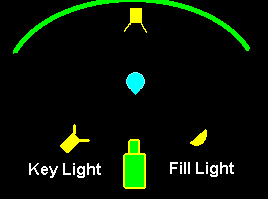
Although the fill can be positioned at any point from right beside the camera to 45 degrees away, it's safest to place the fill 45 degrees from the camera. By lighting a full 90 degree area, an important margin of safety is created in case subjects unexpectedly move and camera angles have to be changed during the production. Having to stop a production to change the position of lights can represent a time-consuming and costly delay not to mention, making you a bit unpopular with the cast and crew. Although the horizontal angle for the key should be about 45 degrees, the vertical angle of the fill is less critical.
Generally, the fill is placed just above the camera, as shown above, which means it ends up being slightly lower than the key. In this position it can easily do what it's intended to do: partially fill in the shadows created by the key light. The height of the fill can be lowered from the grid to the proper
angle by an extension rod (pipe) or by a counterbalanced extension device shown
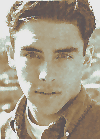
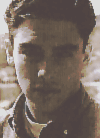
above on the right. We've suggested that the fill light should be softer than the key. A soft light source is able to subtly fill in some of the key's shadows without creating a second catchlight in the eyes. Note in the photo here how the shadow from the key on the cheek is only partially removed by the fill, creating a gradual rounding off of the key light on the cheek. This key-fill difference provides much of the perception of three dimensions that's desirable in a medium that's limited to two dimensions.
A good choice for
a studio fill light is a scoop, or a bank of color-balanced fluorescents. When doing
on-location work these options are a bit unwieldy, so a portable quartz stand light
can be used with a diffuser. The diffuser not only softens the fill light, but it
can appropriately reduce its intensity. We'll cover the relative intensity of each
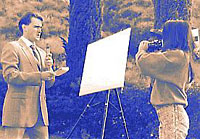
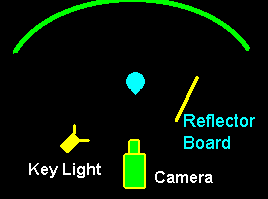
of the lights in the next module. Outside, when the sun is being used as a key, a reflector board can be positioned at about 90-degrees from the sun to reflect sunlight into the shadow areas. Large white Styrofoam or foam core boards are often used for closeups in ENG work. A large blank, white artist canvass in a wooden frame, available at most artist supply stores, is being used here. Although more expensive, folding silver reflectors, available at photo supply stores, are easier to transport and can reflect light much greater distances. Reflector boards can be clipped to a stand, or held by an assistant.
These photos illustrate a subject in harsh sunlight with and without a reflector fill.
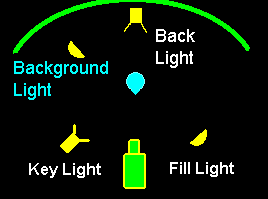
At this point in formula lighting we've covered two of the three lights on the subject. The third point is represented by the back light. The function of the back light is to separate the subject from the background by creating a subtle rim of light around the subject.
If the back light is too low, it will be picked up by the camera in wide shots; if it's too high it will spill over the top of the subject's head, lighting up the tip of the nose, creating "the Rudolph effect," after a well-known reindeer. Compared to the key, a smaller, lower-wattage instrument can be used for a back light for two reasons. First, back lights are often placed closer to the subject than the key light, and, second, with subjects confined to a limited area like a chair, the beams of most Fresnel lights can easily be "pinned down" (focused into a narrower beam) to intensify the beam. By using only back lights with no front lighting a silhouette effect can be created. This can be used for dramatic effects or to hide someone's identity. (Note the photo of the woman reading the script above.) In trying to successfully eliminate all front lightingespecially in an effort to hide someone's identitywatch out for reflected light from walls and the floor.
Remember, on many camcorders there is a back light control that's designed to compensate (to some degree) for this exposure problem. A careful balance between front light and back light can add a 3-D quality to scenes. At this point you should study the effects
of the various lights as
Background lights are used to illuminate the background area and add depth and separation between scene elements. (Remember that a back light is designed to light up the back of subjects and a background light is designed to light up the front of backgrounds.) The effect of the backlight is shown below.
Any type of light can be used as a background light as long as it provides fairly even illumination across the background, does not hit the central subject matter, and is at the appropriate intensity. If the background has detail or texture, you will want to put the background light on the same side as the key, as shown in the drawing above. This keeps the dominant light consistent in the scene. Note in the photo on the left above that you can see the effect of both the back light and the background lights. This brings us to the last major issue in formula lighting: the relative intensity of each of the lights. We'll cover that in the next module. To see all of the lights we've discussed and
their effect carefully study
|
 The
fill light should be placed about 90 degrees away from the key light. This means
that if you draw lines from the key to the subject and then to the fill light, you'll
create a right angle.
The
fill light should be placed about 90 degrees away from the key light. This means
that if you draw lines from the key to the subject and then to the fill light, you'll
create a right angle.