|
Module 33 |
Updated: 07/30/2005 |
|
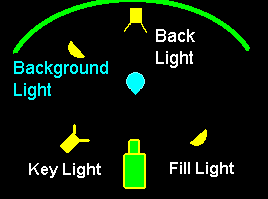
Lighting Unless each of the four basic lights we've discussed is at the proper intensity, the formula lighting approach — or any lighting approach — will not work. Since the key light is the dominant light on the subject, it must be stronger than the fill light. In color production the fill should be about one-half the intensity of the key. This key-to-fill brightness difference is expressed in terms of a lighting ratio. If the key light is twice as bright as the fill, the ratio will be 2:1, which is the standard for most TV applications. At the same time, some lighting directors, especially in TV news, prefer to make the key and fill the same intensity, resulting in a flat, high-key effect. This option will be discussed more in the next module. Using the 2:1 ratio, if the key light is 2000 lux, the fill will be 1000 lux; if the key light is 90 foot-candles (FC) the fill light would be 45 FC. Although many lights may be used in a scene, the lighting ratio refers to the ratio between just two lights: the key and the fill. The key-to-fill ratio affects how the form, dimension, and surface texture of subject matter will be rendered. To achieve dramatic effects, and occasionally to meet the needs of special subject matter, ratios other than 2:1 can be used. More on that later. If a lux or foot-candle meter isn't available to establish the proper lighting ratios, a standard photographic light meter can be used. The f-stop difference between the intensity of lights can be translated into a lighting ratio. To achieve a standard 2:1 ratio we can use the fact that one f-stop up or down will double or halve the amount of light. This means that the light for an exposure of f:16 is twice as bright as the light for an exposure of f:11. Thus, if we only turn on the key light and find f:16 is required for a proper exposure, then to achieve a 2:1 ratio the fill light by itself would have to call for f:11. |
|
Lighting Ratios With differences (in f-stops) required
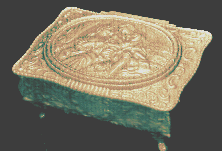
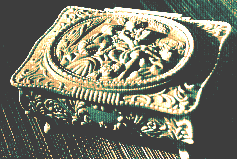
Recall that a simple way of establishing lighting ratios is by controlling the distances between the lights and the subject. Sometimes it's desirable to minimize or smooth out the surface detail of subject matter. If highly diffused key and fill lights are used close to the camera there will be a flattening of the appearance of subject matter and a minimizing of surface detail and texture. Reducing the key-to-fill lighting ratio to 1:1, with the key intensity equal to the fill intensity, adds to this flat lighting effect. We'll re-visit our jewelry box to illustrate this. The first photo below was shot with a low lighting ratio (flat lighting), the second with a high lighting ratio.
Although form and dimension are sacrificed in flat lighting, this type of lighting can be useful in minimizing wrinkles and skin problems, and in creating a soft, flattering effect for the human face. This could be very important in a cosmetic commercial, for example. In contrast, by increasing the key-to-fill ratio to 1:5 and beyond, surface detail and texture will be emphasized—especially if a hard key light is used at an angle from 65 to 85 degrees off to one side, as shown on the right above. The two photos below were taken of the same section of concrete blocks on a wall. The photo on the left was taken on an overcast day, and the photo right was illuminated by the overhead sun on a clear day. Here we can see the difference in both the quality (hardness and softness) of the sunlight and the lighting ratio. On the overcast day the key-fill ratio ends up being about the same, because the light is diffused.
To provide the subtle rim of light
around subjects the back light Subjects who have brown hair and clothes in the mid-gray range will require a back light one and one-half times the intensity of the key. Assuming a key light intensity of 1,500 lux, the back light would then be 2,250 lux. If you don't have a meter that reads in lux or foot-candles, you can simply move the back light slightly closer to the subject than the key light, or until you see the desired subtle rim of light around the subject as shown here. A person with dark hair and clothes will take more back light than a blond wearing light clothing. Be careful to observe the effect on a monitor or in a well-adjusted camera viewfinder.
The color temperature of the back
light is not nearly as critical as it is with key and fill lights. Within limits,
dimmers can be used. Background Light Intensity Because the background is of secondary importance to the center of interest, it should receive a lower level of illumination. Generally, the intensity of background light should be about 2/3 the intensity of key light. This will insure that the central subject matter stands out slightly from the background. In case you have forgotten Math 101, you can get two-thirds of any number by multiplying it by two and dividing the result by three. Therefore, if the key is 2,000 lux, the light falling on the background should measure about 1,300 lux. If you are using a photographic meter, you can set the background light 1/2 to 2/3 of a f-stop less than the key light.
But, the light across the background should be even—especially if you are using chroma key. By walking across the background area with an incident light meter, you can find dark or bright spots. Subject-to-Background Distance Shadows on backgrounds from mic booms, moving talent, etc., can be distracting and annoying. Background lights will lighten, but normally not eliminate, shadows. However, by moving subjects 3 meters (9 or more feet) away from a background, you will find (if the key is at an elevation of 45 degrees) that shadows will end up on the floor, out of sight, instead of on the back wall behind the subject. Sometimes, however, it's necessary for talent to move in close to a background. An example would be someone explaining a chart on a wall. The use of a large softlight would render the shadows from the front lights almost invisible—if you don't mind the soft, diffused look it will create in the video. Otherwise, you will just need to use a key angle that doesn't create distracting shadows. Unduly dark backgrounds can be brightened up by using a higher level of illumination, and bright, intrusive backgrounds can be "pulled down" by lowering background illumination.
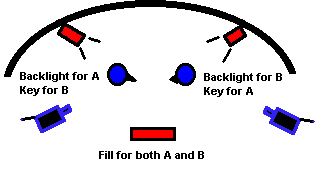
Occasionally, you can make lights serve dual purposes and still maintain the three-point lighting effect. Here, a one-on-one interview is lit with only three lights. Note that each of the (very carefully placed) lights serves two purposes.
This can work well under carefully controlled situations where you know in advance the color of each person's hair (or, possibly, lack of of it) and the color of their clothes. In using this approach you won't have much latitude in accommodating special needs. In this situation the chairs can't be moved without upsetting the lighting balance. In the next module we'll take up some special lighting situations. |


 has
to be slightly brighter than the key. In the case of an on-camera person, back light
intensity will depend on the hair color and clothes.
 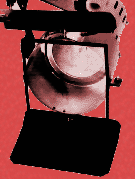 With
subjects who have hair and clothing of similar reflectance, the intensity of the
back light is not too difficult to determine. But difficulties arise when a person
has dark hair and a light coat, or blond hair and dark clothing. In such cases the
beam of the back light(s) can be partially masked off with barn doors so that the
brightest part of the beam will hit the dark areas.
  Since
backgrounds are typically one-dimensional (flat) and of secondary importance to
the main subject matter, the placement of the lights and their angles are not critical.
 If distances are carefully controlled, the lights will be 50 percent brighter as
back lights than as keys.