|
Module 34 |
Updated: 08/04/2005 |
|
Special
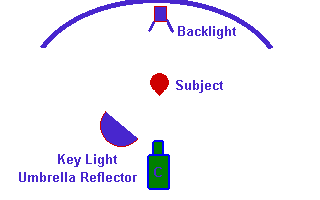
Although the three-point lighting approach we've discussed can be relied upon to produce excellent results, we also need to look at some special lighting situations. Let's start with a simplified design that creates a softer effect than the three-point formula approach we've covered. In the drawing below note that a soft front light replaces both
the key and fill. The umbrella reflector shown here, Although the picture produced will not provide the same depth and dimension as formula lighting, the softer effect may be more flattering for some subjects, especially if wrinkles and age lines are an issue. If the background is close behind a subject, this may eliminate the need for a background light. Since you are using a diffused light source, the background will probably be softly lit and shadows on the background will be less noticeable. A backlight is still desirable to provide needed subject-background separation.
|
 or
a light bounced off a large white card, will provide similar results. In this
case the broad area covered by the key acts as both a key and a fill.
or
a light bounced off a large white card, will provide similar results. In this
case the broad area covered by the key acts as both a key and a fill.|
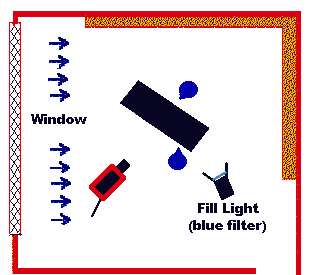
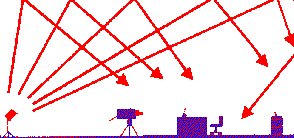
Using A Window Light As A Key Sunlight from a window can also be used as a key. The fill light shown here comes from an incandescent light on a stand. Without a blue filter over the light, it will look unacceptably yellow compared to the sunlight. (Recall the differences in color temperature between sunlight and quartz lights.) A light meter (or a good video monitor) can aid in creating the desired 2:1, key-fill lighting ratio. For short ENG segments bounced light can be used. The drawings below show approaches for large and small rooms. Although the soft lighting effect leaves a bit to be desired, this approach may be adequate for short segments. Note that this design uses a single light bounced off the ceiling.
Obviously, Bounced light creates a soft, even light throughout the entire room, an effect that is similar to what we are used to seeing with overhead fluorescent lights. If the camera is back far enough, a light mounted on top of the camcorder can be aimed at the ceiling for a bounced light effect. The camera and attached light should be far enough back from the subject so that the light will come down at an acceptable angle. If the light is too close to the subject, dark eye shadows will result. If the walls of the room are a light, neutral color, they will reflect part of the bounced light and more fully fill in shadow areas. The second drawing assumes
a smaller room. Although much light will be lost in the double-bounce process, with today's highly sensitive cameras this should not be a problem. To help compensate for the color that the ceiling and walls will add to the light, be sure to color balance the camera under the bounced rather than the direct light. More traditional lighting for a typical office interview is
explained Lighting Multiple Subjects Thus far we have covered the lighting of one subject only. Life isn't always that simple. First, we'll take a look at a typical three-person interview setup. Note below that even though things appear to be much more complex, we've only just repeated the basic three-point lighting setup for each of the three people.
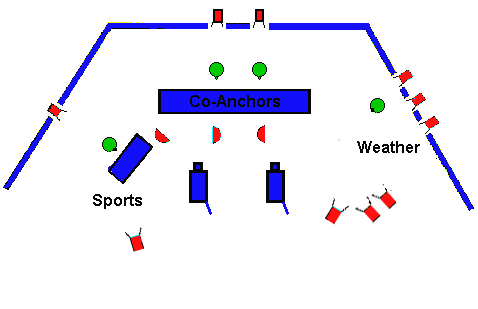
A simple news, weather and sports set is shown below. By panning to one side or the other, the two cameras can get one of the co-anchors, or the sports or weather person. Also note that the positions of the key and fill lights provide three-point lighting coverage for each of these camera positions. Background lights are not shownand they may not be needed because of the accumulaton of ambient light on the background.
As previously noted, some lighting directors prefer a flat, high-key approach to lighting news anchors. This is done by either making the key-fill ratios even (1:1), or by placing key lights directly over the cameras. Other lighting directors feel that a 1:1 ratio flattens facial features and robs scenes of dimension. And, as we've noted, by putting key lights directly over cameras it can make teleprompters more difficult to read. Some lighting directors go for an even "flatter" appearance by adding lights below the eyeline of the subjects to erase chin shadows. Now let's take a look at a rather complex lighting setup.
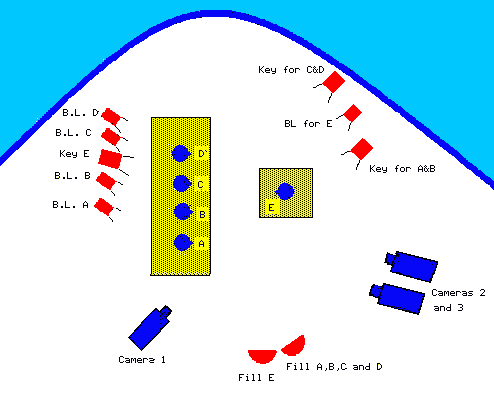
Note that two large Fresnels are used to key all of the subjects on the left, and five smaller Fresnels are used as back lights on these subjects. One of these backlights also keys the person on the right. Two scoops provide the necessary fill light for the entire set. Barn doors keep lights intended for one person from spilling over onto another person or area. Sometimes you may need
to develop non-formula lighting designs for special dramatic effects. The author
once did a cabaret-style network series where the
following low-key lighting design was used. Area Lighting So far, we've covered subjects conveniently confined to one place. But what if one or more subjects must be free to roam around a set while on camera? There are four ways this can be handled. 1. First, the entire area can be flooded with a base light, which is an overall, even light. Scoops or color-balanced fluorescents will work here, assuming the area isn't too large. Important closeup camera talent positions are then keyed with lights at twice the intensity of the base light. Small pieces of tape placed on the floor can provide marks for the talent to "hit" as they move from one major camera position to another. With this approach you will probably not want to barn off the lights any more than necessary, because illuminated areas should be kept large enough to give the talent a margin of error in missing their marks. 2. The second approach involves keying, filing, and backing the entire area (generally, a dramatic setting). Here the whole working rangeassuming it's not too largeis treated as a single subject. This will require a powerful (high-wattage) key light positioned at a great enough distance to cover the entire area. If the key is placed in the center of the set, 90-degrees to the back wall, the angle will be appropriate for cameras positioned at each side of the set. One or more Fresnels with diffusers placed at either side of the set can serve as fills. (Scoops or banks of color-balanced fluorescent lights will not throw light far enough to reach the back of a large area.) If multiple keys are needed to achieve a high enough level of illumination over the set, they should be positioned as close together as possible to reduce the problem of multiple shadows and multiple catchlights in eyes.
3. The third approach to lighting a large area is to divide the set into individual areas, and key, fill, and back each area. Often, large interior settings are divided into four or more parts for keying, filling, and backing. Typically, the lights at the edge of each of these areas will just begin to merge. With this approach it's important to make sure that closeups on the talent will not be in the transition points between lighted areas. Keep in mind the sources of light that may be suggested by the settingvisible table lamps, windows, etc. Place the key lights so they will be consistent with these suggested sources of illumination. As we've previously noted, this is called following source. 4. The last approach to lighting a large area would be appropriate to simulate an interior at night. This technique would use a low key lighting ratio from 3:1 to 6:1, and the talent would move in and out of specifically defined set areas. Only important, closeup areas would be lit, leaving the rest of the scene relatively dark. With this approach it's especially important to follow source;
i.e., place keys so that they are consistent with the visible or suggested sources
of light within the setting. If a person were sitting next to a reading lamp, the
key would have to be angled so that the light would appear to be coming from the
table light. In some cases you may want to use a low-level base light over the entire
set to keep in-between areas from going too dark. Using A Stand-In Whatever lighting approach you use, the lighting can be checked on camera by having a stand-in (a person of similar height, skin color, and clothing as the talent involved). This person should slowly walk through the various designated talent positions on camera as the lighting is carefully observed on a good color monitor. During the show's dress rehearsal with the actual talent any
remaining problems can be spotted and then fixed during the break between the dress
rehearsal and the actual production. Existing (Natural) Light In news and documentary work the most "honest" approach to lighting is to make use of the existing (natural) light present at the location. This shows things as they really are (within the limitations of the video process), rather than after they have been altered or embellished by "artificial" lighting. The problem is that existing light is often unsuitable. The
contrast ratio can be too extreme; there can be mixed sources of light (daylight,
incandescent light and fluorescent light all at the same location); or, the light
level can be too low for a quality video Note that the existing light photo here suffers from both underexposure and a high contrast ratio. There's also another consideration: people are used to seeing interviews, etc., enhanced by good lighting. Without it, it appears to many viewers that "the picture's dark," or "the picture isn't good." This is not unlike the situation photojournalism faced a few
decades ago when existing light still photography was first used in publications
such as Life magazine. Since people were used to seeing flash-on-the-camera
photos, natural light photography seemed unnaturaleven though it accurately showed
the actual conditions being photographed. (Flash was necessary in the early days
of photojournalism because of the relatively slow speed of film and Occasionally in dramatic productions you have to fake lighting to make it look real. Here, the light from a computer screen is insufficient to illuminate the child's face. So to simulate this setting, a light with a blue filter is positioned on the other side of the computer monitor. As
videographers strive to add an artistic dimension in their work, they start to rely
more and more on shadows to convey meaning. By studying
|
 you
must be working in a room with a relatively low white or light-gray ceiling. The
white, acoustic tile commonly found in offices works well.
you
must be working in a room with a relatively low white or light-gray ceiling. The
white, acoustic tile commonly found in offices works well. To
keep the light from coming down on the subject at too steep an angle, it's aimed
at the back wall. Again, this approach creates an extremely soft effect, which may
or may not be desirable.
To
keep the light from coming down on the subject at too steep an angle, it's aimed
at the back wall. Again, this approach creates an extremely soft effect, which may
or may not be desirable.
 Over
a large area multiple back lights will have to be used. They should be aimed to
create slightly overlapping pools of light over the whole talent area. The talent
should be able to walk from one area to another without obvious variations in back
light.
Over
a large area multiple back lights will have to be used. They should be aimed to
create slightly overlapping pools of light over the whole talent area. The talent
should be able to walk from one area to another without obvious variations in back
light. signal.