|
Module 35 |
Updated: 07/07/2005 |
|
Altering
There are situations when you will want to consider special lighting approaches to accommodate difficult subject matter or to alter the look of a subject.
Minimizing Surface Detail First, let's look at how you can combine what we've covered to completely minimize surface detail. Although we've previously seen how the quality of light can be used to do this, now we're going to combine three approaches to further enhance this effect. Three are -
This lighting plot shows these modifications. 1. Instead of the normal 90-degree angle between the key and the fill, note that here the front lights have been moved as close to the cameras as possible. In the process, detail revealing shadows have been virtually eliminated. 2. Next, note that the soft light sources are equipped with spun-glass diffusers. The resulting ultra-soft illumination further minimizes detail-revealing shadows. 3. Finally, the lighting ratio between the two lights has been reduced from the normal 2:1 to 1:1, which means that the two front lights are of equal intensity. Keep in mind that you only need to change front lighting; the position or intensity of the backlight and background light will not change. In most cases you will not want to go to the extreme of making all of these changes. (Note below this approach makes the chocolate chip cookie on the left looks pretty dull and lifeless.) For example, you may decide to stay with a 2:1 lighting ratio and just move the lights closer to the camera and use diffusers; or, you might want to check the effect of just using diffusers.
(Recall that the lighting tent illustrated in an earlier module is actually the ultimate in soft lighting. However, this approach is impractical for lighting people or large areas.) |


|
1. Note in the drawing below that the key has been moved to about an 85-degree angle to maximize shadows and surface detail. 2.
Next, you will want to use a hard source of light for a key. A focusing
light such as the ellipsoidal spot we talked 3. Finally, we would want to increase the lighting ratio to at least 4:1. By eliminating the fill light altogether we would go considerably beyond 4:1 and maximize the lighting ratio. Again, it's generally not desirable to alter the back light position or intensity, or the intensity or position of a background light. The photo on the left below
shows how effective side lighting is in bringing out detail in this ancient carving.
Without the effect of this type of light, much of the detail would be lost.
Two hard key lights, one on either side of the coin, lit the closeup of a 50-cent piece above. The angles of these lights are so oblique (and precisely aimed) that only the raised portions of the coin are illuminated. This keeps the background areas dark.
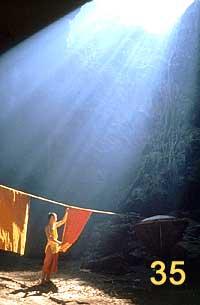
When the primary (key) light is placed at a low angle, a dramatic or mysterious effect can be achieved.
Two terms that are often misunderstood in lighting are high key and low key. These terms have nothing to do with overall light intensity. Instead, they refer to the angle of front lighting (generally the key light) and the resulting presence or lack of shadow areas. The photos below might help in seeing this distinction. A high key
Sitcoms, variety shows, etc., are normally lit high key. The first cookie shown at the beginning of this module was lit in a very high key fashion. On the other hand, a scene lit in low-key
would have It's important to remember that in all these examples the intensity of the key light could be exactly the same. We are not talking about "bright lights" in high key setups and "dim lights" in low-key setups. In actual fact, under "dim light" we would simply have to open the camera's iris in order to achieve adequate exposure, and then our so-called "low key" effect would instantly disappear. It's only the angle of the key and the lighting ratio that make the difference between high key and low key. If you
already haven't done so, check out the examples We've covered some special lighting situations in this module. But, remember, unless there is a compelling reason to use these techniques, you will find that the standard three-point formula approach covered earlier will yield the best results.
|
 about earlier will create the desired effect.
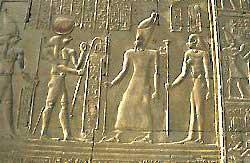

 We
are used to seeing primary light sources coming from above subjects-typically, sunlight,
or the 45-degree angle of a key light.
We
are used to seeing primary light sources coming from above subjects-typically, sunlight,
or the 45-degree angle of a key light.  scene
would be an evenly lit scene, one that has no intrusive shadow areas. (Note the
surface of the strawberries.)
scene
would be an evenly lit scene, one that has no intrusive shadow areas. (Note the
surface of the strawberries.) pronounced shadow areas. (Note photo on the right.)