|
Module 43 |
Updated: 07/07/2005 |
|
Audio Control
|
 a level, distortion can result; and if levels are too low, noise can be introduced
when levels are later brought into the normal range.
a level, distortion can result; and if levels are too low, noise can be introduced
when levels are later brought into the normal range. 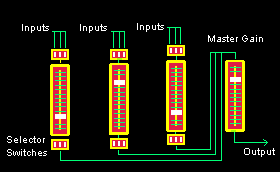 fader
can switch between such things as microphones, CDs, videocassette machines, and
satellite feeds.
fader
can switch between such things as microphones, CDs, videocassette machines, and
satellite feeds. |
Using Multiple Microphones in the Studio Most studio productions
require several mics. Since the mics, themselves, may have only a 5 to 10 meter
(15-30 foot) cord, mic extension cables may be needed to
plug the microphone Since things can get confusing with a half-dozen or more mics in use, the audio operator needs to make a note on which control on the audio board is associated with which mic. A black marker and easily removed masking tape can be used on the audio board channels to identify what mic is plugged into what channel. Mic numbers ("lav 1") or talent names ("John") can be used for identification. Because mics represent one of the most problem-plagued aspects of production, they should be carefully checked before the production begins. Unless you do this, you can expect unpleasant surprises when you switch on someone's mic, and there is either no audio at all, or you faintly hear the person off in the distance through another mic. Either way, it's immediately clear that someone goofed. There is another important reason that mics should be checked before a production: the strength of different people's voices varies greatly. During the mic check procedure you can establish the levels (audio volume) of each person by having them talk naturally, or count to 10, while you use a VU meter to you set or make a note of the appropriate audio level. Of course, even after you establish an initial mic level for each person, you will need to constantly watch (and adjust) the levels of each mic once the production starts. During spirited discussions, for example, people have a tendency
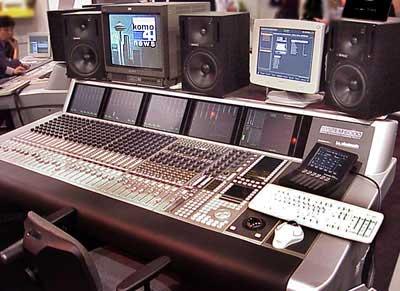
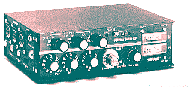
to get louder. It is also good practice to have a spare mic on the set ready for quick use in case one of the regular mics suddenly goes out. Given the fragility of mics, cables, connectors, etc., this is not an unusual occurrence. A traditional audio board is shown above. Note the standard VU meters at the top of this stereo model. As production facilities move to
digital audio, boards are taking on a different appearance. Like the new digital
switchers and lighting boards, the latest generation of audio boards makes use of
an LCD video display. A recent model is shown below.
If only one mic is needed in the field, it can simply be plugged into one of the audio inputs of the camera. (The use of the internal camera mic is not recommended except for capturing background sound.) When several microphones are needed and their levels must be
individually controlled and mixed, a small portable audio mixer will be needed.
The use of an audio mixer generally requires a separate audio person to watch the
VU meter and maintain the proper level on each input. Portable AC (standard alternating current) or battery-powered audio mixers are available that will accept several mic or line-level inputs. The output of the portable mixer is then plugged into a high-level video recorder audio input (as opposed to a low-level mic input). Most portable mixers have from three to six input channels. Since each pot (fader or volume control) can be switched between at least two inputs, the total number of possible audio sources ends up being more than the number of faders. Of course, the number of sources that can be controlled at the same time is limited to the number of pots on the mixer. There is a master gain controlgenerally on the right of the mixerthat controls the levels of all inputs simultaneously. Most mixers also include a fader for headphone volume Although handheld
mics are often used for on-location news, for extended interviews it's often easier
and more Whereas the mixer shown above will probably require a special audio person to operate, the cameraperson can operate the simple two-mic mixer shown on the left. The output from the unit is simply plugged into the camcorder. A slightly different approach to this was discussed in Module 39. Audio mixers and consoles use two types of controls: selector switches and faders. As the name suggests, selector switches simply allow you to select and direct audio sources into a specific audio channel. Faders (volume controls) can be either linear or rotary in design. As we've noted, faders are also referred to as attenuators, gain controls, or pots (for potentiometers).
Linear faders are also referred to as vertical faders and slide
faders.
You will recall from the last module that digital audio equipment typically requires different optimum levels than analog equipmentand even that standard varies with different countries. However, to reduce confusion in the following discussion we'll use the analog standard of 0dB to represent a maximum level. Normal audio sources should reach 0dB on the VU or loudness
meter Having to turn a fader up fully in order to bring the sound up to 0dB indicates that the original source of audio is coming into the console at too low a level. In this case the probability of system background noise increases. Conversely, if the source of audio is too high coming into the board, opening the fader very slightly will cause the audio to immediately hit 0dB. The amount of fader control over the source will then be limited, making smooth fades impossible. To reflect the various
states of attenuation (resistance), the numbers on some faders are the reverse of
what you might think. The numbers get higher (reflecting more resistance) as the
fader is turned down. Maximum resistance is designated with an infinity symbol,
which looks like an "8" turned on its side. When the fader is turned up all the
way, the number on the pot or linear fader may indicate 0, for zero resistance.
Even so, just as you would assume, when the pot is turned clockwise or the fader
control is pushed up, volume is increased. Level Control and Mixing Audio mixing goes beyond just watching a VU meter. The total subjective effect as heard through the speakers or earphones should be used to evaluate the final effect. For example, if an announcer's voice and the background music are both set at 0dB, the music will interfere with the announcer's words. Using your ear as a guide, you will probably want to let the music peak at around-15dB, and the voice peak at 0dB to provide the desired effect: dominant narration with supporting but non-interfering background music. But, since both music and voices have different frequency characteristics (and you'll recall that, unlike VU meters, are ears are not equally sensitive to all frequencies), you will need to use your ear as a guide. During long pauses in narration you will probably want to increase the level of the music somewhat, and then bring it down just before narration starts again. In selecting music to go behind (under) narration, instrumental
music is always preferred. If the music has lyrics sung by a vocalist (definitely
not recommended as background to narration) they would have to be much lower
so as not to compete with the narrator's words. Using Audio From PA Systems In covering musical concerts or stage productions a direct line from a professionally mixed PA (public address) system will result in decidedly better audio than using a mic to pick up sound from a PA speaker. An appropriate line-level output of a public address (PA) amplifier fed directly into a high-level input of a mixer can be used. (NOTE:The regular speaker outputs from the PA amplifier cannot be used; they can severely damage the mixer.) |
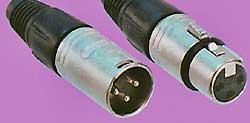 into
the nearest mic connector (generally in a wall). Studio mics use cables with three-prong
XLR or Canon connectors, as shown on the left.
into
the nearest mic connector (generally in a wall). Studio mics use cables with three-prong
XLR or Canon connectors, as shown on the left. 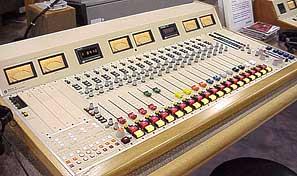 Monitoring
audio gain will be discussed below.
Monitoring
audio gain will be discussed below. 
 natural
to equip both the interviewer and the person being interviewed with personal mics.
natural
to equip both the interviewer and the person being interviewed with personal mics.
 A
rotary fader is shown here.
A
rotary fader is shown here. 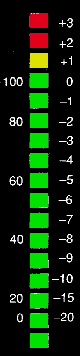 It's
important to maintain optimum levels throughout a production. This is commonly referred
to as riding gain.
It's
important to maintain optimum levels throughout a production. This is commonly referred
to as riding gain. 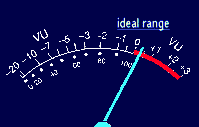 (next to the 100 in the illustrations) when the vertical fader or pot is one-third
to two-thirds of the way up (open).
(next to the 100 in the illustrations) when the vertical fader or pot is one-third
to two-thirds of the way up (open).