|
Module 17-1 |
Updated: 07/20/2005
|
|
Cameras: The Basics Part I With all that has gone
before as a background, we can now turn to the first in a series of modules on the
camera and its associated equipment. Camera Imaging Devices
|
|
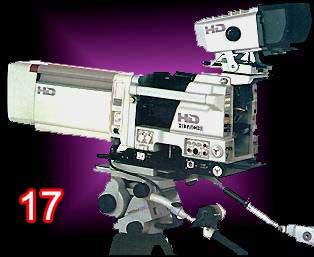
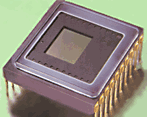
The latter camera, and in fact most
of today's video cameras, The most common chip sizes are 1/4 inch, 1/3 inch, 1/2 inch and 2/3 inch (the size of the little box shown near the center of the CCD chip above).
|
|
Video resolution is a measure of the ability of a video camera to reproduce fine detail. The higher the resolution-the more distinct lines in a given space that the camera can discern-the sharper the picture will look. We'll take a closer look at how this is measured in a moment. The standard NTSC broadcast TV system can potentially produce a picture resolution equal to about 300 lines of horizontal resolution. (This is after it goes through the broadcast process. What you see in a TV control room is generally much higher.) CATV, DVD and satellite transmissions as viewed on a home receiver can reach 400 lines of resolution. Note that lines of resolution is different that the total number of horizontal scanning lines, which is 525 or 625 in SDTV. Three- to four-hundred lines of resolution equal what viewers with 20-20 vision can see when they watch a TV screen at a normal viewing distance. "Normal" in this case translates into a viewing distance of about eight times the height of the TV picture. So, if the TV screen were 40 cm (16 inches) high, a so-called 25-inch (64-centimeter) picture, the normal viewing distance would be about 2 meters (10 feet). HDTV/DTV, with its significantly higher resolution, makes possible
both larger screens and comparatively close viewing distances. Although most home TV sets are capable of only 300 or so lines of resolution (and that's on a good day!), TV cameras are capable of much higher resolutions - up to 1,000 lines or more. And so this question arises: Why bother with high resolution in cameras with their added costs when the home TV set can't reproduce this level of sharpness? Answer: As in most aspects of TV production, the better quality
you can start out with the better the quality will be for the TV viewer - even with
all the broadcast-related losses. Determining Resolution Charts that contain squares or wedges
of lines on a light background can indicate the limits of sharpness. Numbers such as 200, 300, etc., appear on the chart next to the corresponding line densities. By exactly filling the camera viewfinder with the resolution chart and observing the point on the chart where the lines appear to blur together and lose definition, we can establish the limits of resolution. High-quality standard definition, NTSC cameras can resolve about 900 lines; HDTV/DTV cameras well over 1,000 - well off the chart shown here.
The resolution we've been discussing is based on the sharpness of the black and white (luminance) component of the TV image. It was discovered early in the experiments with color TV that the human eye perceives detail primarily in terms of differences in brightness (luminance differences) and not in terms of color (chroma) information. When NTSC color television was developed an ingenious and highly
complex system of adding a lower-resolution color signal to the existing black-and-white
signal was devised. Using this system, color information can be added to the existing
monochrome signal without having to greatly expand the information carrying capacity
of the original black-and-white signal. Minimum Light Levels for Cameras Television cameras require a certain level of light (target exposure) to produce good-quality video. This light level is measured in lux or foot-candles. The latter is used in the United States and lux is used in other countries. A foot-candle, which is a measure of light intensity from a candle at a distance of one foot (under very specific conditions). The origin of the term "lux" is not known, although it's assumed to refer to lumens (a measure of light power) times ten. Since we'll refer to both lux and foot-candles throughout these modules, you'll need to know that a foot-candle is equal to about 10 lux. (Actually it's 10.76, but 10 is generally close enough, and it's much easier to use in conversions.) Most professional video cameras require
a light level of at least 75 foot-candles (750 lux) to produce the best quality
video. However, some will produce marginally acceptable video under a
few lux of light. With consumer-type camcorders you will find advertising literature claiming that a particular camera is capable of shooting pictures under one lux of light. (The light falling on a subject from a 60-watt light bulb 3 meters (10 feet) away is about 10 lux.) However, if you have ever tried this with a consumer-type camera, you know that you can't expect much in the way of impressive video quality. Although an EIA standard is in place in the United States to specify minimum quality standards for light levels, adherence to this standard is not mandatory. Since manufacturers know that consumers want cameras that shoot under low light levels, they are reluctant to use the EIA standard and look inferior to a competitor who is not adhering to the standard. Suffice it to say, if you are in the market for a camera and you don't see the EIA standard specified, you need to check out any low-light level claims. By just zooming in on the darkest corner of the room and observing details in the darkest areas, you can make a rough comparison of the light sensitivity of different cameras. At low light levels the iris of a camera must be wide open (at the lowest f-stop number) to allow in the maximum amount of light. As the light level increases in a scene the iris of the lens must be stopped down (changed to a higher f-stop number) to maintain the same level of exposure on the camera target. Under low light conditions video can quickly start to look dark with a complete loss of detail in the shadow areas. To help compensate, professional cameras have built-in, multi-position, video gain switches that can amplify the video signal in steps from 3 up to about 28 units (generally the units are in decibels or dB's). But, the greater the video gain boost, the greater the loss in picture quality. Specifically, video noise increases and color clarity diminishes. Still and motion picture cameramen
who are used to working with IE/ISO (film speed) exposure indexes, may want to determine
the light sensitivity of their video cameras. This information is often not available
from camera manufacturers, but can be determined in
For situations that require video
under The most refined of these can produce clear video at night using only the light from stars (a light level of about 1/100,000 lux). Under conditions of "no light" most of these modules emit their own invisible infrared illumination, which is then translated into a visible image. In recent years camera operators covering news have found night vision devices useful in covering nighttime stories where any type of artificial lighting would call attention to the camera and adversely affect the story being covered.
Although a tripod may be a hassle to carry and set up, the results can be well worth the effort-especially when displayed on HDTV screens where camera movement on static scenes can make an audience a bit "sea sick." Exceptions to using a tripod are in news and sports where you must be mobile enough to follow moving subjects, documentary style production where shots are brief and rapid, and subjective camera shots that simulate what a moving subject is seeing. In recent years some commercials and dramatic productions have been using handheld cameras in scenes as a way of imparting a "fluid," "on-the-go" feeling. (Hand-holding a camera also saves valuable production time, which means money!) The award-winning film, Traffic, released in 2001, had many handheld shots designed to impart a "documentary frenzy" to some of the scenes. TV series such as the various incarnations of Law & Order also use this approach. In the hands of a professional director of photography this effect can work; however, when less experienced videographers attempt to handhold a camera (especially while zooming, panning and tilting) the effect can look amateurish and even make viewers a bit nauseous. If you examine most exemplary mainstream films and video productions you will find solid, steady shots-the kind that are only possible with a solid camera support. On most tripods the pan and tilt
head (which attaches the camera to the tripod) is not meant to be used for smooth
panning and tilting while shooting-only to reposition and lock the camera into position
between takes. And, this may be just as well, given the fact that a cut from
one scene to another is faster and generally better than panning, tilting or zooming
to new subject matter. Even so, pans and tilts are commonly seen-especially for following action, for revealing the relationship between objects in a scene, etc. Therefore, many tripods have heads designed to smooth out pan and tilt movements. The most-used type is the fluid head that adds a uniform resistance to pans and tilts-just enough to smooth out the process.
A simple camera "mount" The "beans" inside are small round soft plastic balls that can assume the shape of the surface the bag sits on. The top of the bag can adjust to the bottom of a camcorder, providing a degree of camera stability. When used on accommodating surfaces, bean bags can represent a quick approach to getting shots.
Wireless Camera Modules Although camera operators doing "live" broadcasts from the field used to have to be "hard wired" to a production truck, today's cameras can be equipped with an RF (radio frequency) transmitter. One is shown here on the back of a camcorder. The camera signal is transmitted to the production truck where it appears on a monitor just like any other source of video. These units are commonly used in award programs, allowing cameras operators to freely roam throughout the isles to get shots of audience members without the problem of trailing vexatious, hazardous camera cables.
(Click on "more" for the second half of this section.) |

 The
very heart of a video camera is its imaging device. The first TV cameras used rather
large tubes, as shown on the left. Some early color cameras had four of these
tubes (for red, blue, green, and luminance), which explains why early color TV cameras
weighed more than 200 kilograms (500 pounds) and had to be hauled around in trucks.
 An
example of one of these cameras, which was used in broadcasting in the 1950s, is
shown next to the woman on the right. Note how it compares to one the latest pocket
sized cameras (complete with a video recorder) shown in the insert at the bottom
of the photo.
 use
an imaging chip, such as the CCD shown on the left. Many cameras now use a
CMOS chip, but at this point the distinction is not that important.
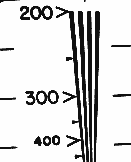
 Within
a particular area of one of these resolution charts there are lines that converge.
The illustration on the left was taken from the full test pattern image shown above.

 very low light, night vision modules are available that use electronic light multipliers
to amplify the light going through a lens. (Note photo on right.)
 Using
a camera tripod can make the difference between professional looking video and video
that screams "amateur at work."
 that works in many situations is the bean bag. The photo
on the left shows one on the door frame of a car.