|
Module 31 |
Updated: 07/30/2005 |
|
The Key In typical lighting setups, lighting instruments serve four functions:
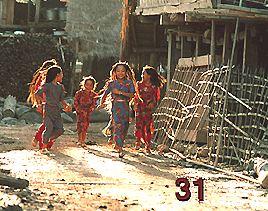
The photo below was shot with so-called formula
or Even though some lighting directors say there is no such thing as a "formula" for lighting, the formula we'll discuss will provide excellent results for most of your video work. Later, we'll have a series of examples that shows this formula in action. If you study this photo you may detect four light sources:
The combination effect of these four lights (put in exactly the right place, at exactly the right intensity and with the right quality/coherence), creates an optimum over-all effect. We'll start with the key light in this module and take up the other lights later. By the way, in case you are wondering, yes, we call this three-point lighting, even though it involves four lights. Since the background light is not really on the subject, it doesn't count in three-point lighting.
|
 three-point
lighting.
three-point
lighting.|
Key Light Considerations As the name implies, the key light is the main light.
In terms of coherence or quality, it should be in the middle of the hard-to-soft range. As you can see from some of the illustrations in these chapters, light that is either too hard or too soft is not desirable for most subject matter. In the studio, this "middle ground" is achieved with a Fresnel light.
In the photograph of the model above, the key light is on the left, just as it's shown here. Forty-five degrees off to one side is best (as shown in the drawing), because, among other things, it brings out more texture and form (dimension) in the subject. For the sake of consistency, the 45-degree angle will be used throughout this discussion. This brings us to the rule we'll need to keep in mind, especially if multiple cameras and camera angles are involved in the production: Light for the closeup camera. In multiple-camera productions you will have to confer with the director during the camera-blocking phase of preproduction to find out which cameras will be taking most of the closeups of each person. Does it matter if the key is on the right or the left? Possibly. There are four things you need to think about in making this decision.
One thing you don't want is to "put lights everywhere" in a frantic effort to wipe out every shadow from every conceivable camera angle. In a studio setting where there are multiple areas to light, you can end up with scores of lights. Three-point lighting for a closeup position will end up being 20-point lighting, which is the same as poor lighting. It's not unusual for a large set in a major dramatic setting to require more than 100 lights. Unless basic lighting simplicity is preserved on the major closeup talent positions, things can end up in a mess-which brings us to another lighting guideline: The simpler the design, the better the effect. Among other things, the key light creates the catchlight in eyes-the (single) spectral reflection in each eye that gives the eyes their "sparkle." Note the catchlight effect in the photo of the model at the beginning of this section. When you "put lights everywhere," it not only results in a multitude of catchlights in eyes, but it generally results in flat, lifeless lighting. Numerous lights hitting talent areas also create a confusing horde of shadows. Barn doors and flags can be a great help in keeping light out of unwanted areas. In single-camera, film-style production things are much easier, because there is only one camera angle to worry about at any one time.
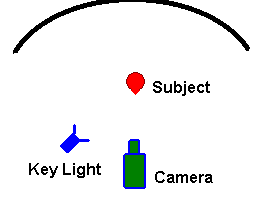
We have established that the horizontal angle for the key light is approximately 45 degrees to the left or right of the subject in relation to the camera. One other key light angle should be considered: elevation. As shown below, this angle is also commonly 45 degrees for the key light. We'll cover the other lights shown later.
Some lighting directors prefer to place the key right next to the camera, or at a vertical angle of less than 30 degrees. Sometimes in limited on-location conditions this may be unavoidable. However, three problems result from reducing these angles:
Ideally, when the talent face their closeup camera they should see the key light 45-degrees off to one side of the camera at an elevation of about 45-degrees-which is not unlike the effect we often see outside in sunlight.
Since the key light is the brightest light on the front of a subject, it's the one that will create the darkest shadows. Shadows from boom mics (microphones suspended from long poles over the talent areas) can be minimized by positioning the boom parallel to (directly under) key lights. By not placing talent too close to a background, the boom shadow
will end up on the floor rather than creating distracting shadows on the background-assuming
you keep the key at the recommended height of 45 degrees. The Sun As a Key When shooting on location during the day, the sun will normally be your key light. However, direct sunlight from a clear sky results in deep, black shadow areas with a major loss of detail. If the sun is directly overhead, a "high-noon effect" will be created, producing dark eye shadows. Put technically, in both instances you've grossly exceeded the brightness range of the video system. Suffice it to say, direct sunlight, especially for closeups, can look unflattering-not only to the person in front of the camera, but for your mastery of production skills. To get around the "high noon effect," it may be best to shoot sunlit, on-location productions in midmorning or mid-afternoon when the sun is at an elevation of about 45 degrees. If subjects can also be oriented so that the sun (the key light) ends up being 30 to 45 degrees off to one side of the camera, lighting will be best-especially if a fill light (to be discussed in the next section) is used to slightly fill the shadows caused by the sun.
But there can be a problem. Note the bright background in this photo. In camcorders with automatic exposure control this will result in underexposure (with unnaturally dark skin tones) unless the back light control is used to open up the iris two or three f-stops. If the camera has a manual iris control, you have an even better
option. You can manually open the iris while carefully observing the result
in the The soft light effect in direct sunlight can be achieved with the help of a large translucent screen. A thin white sheet can sometimes be used, but for professional applications commercial versions, such as this Griffolyn screen, are available. Although this setting is in direct sunlight, the subjects sitting in the Jeep are softly lit.
|
 In
three-point (formula) lighting the key light is placed at an angle of between 30-
and 45-degrees from either the left or the right of the camera.
In
three-point (formula) lighting the key light is placed at an angle of between 30-
and 45-degrees from either the left or the right of the camera.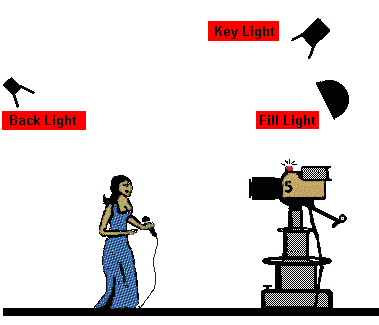
 On
an overcast day the diffused sunlight will provide a soft source of light. If the
diffused sunlight is coming from behind the subject, it can provide good back lighting,
while the ambient light from the overcast sky furnishes soft front lighting. With
the proper level of cloud cover this can result in soft, flattering lighting, as
shown in this illustration.
On
an overcast day the diffused sunlight will provide a soft source of light. If the
diffused sunlight is coming from behind the subject, it can provide good back lighting,
while the ambient light from the overcast sky furnishes soft front lighting. With
the proper level of cloud cover this can result in soft, flattering lighting, as
shown in this illustration. viewfinder.
(Recall that the module on
viewfinder.
(Recall that the module on