|
Module 59 |
Updated: 08/30/2005A |
|
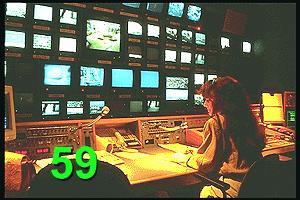
Studio
As a first step in seeing how studio productions are done we need to take a closer look at the role and responsibilities of the key person in this process-the director.
In addition to the specific duties and responsibilities outlined in Module 1, the director's job is to get the crew and talent to function as a team, and in the process bring out the best work of each person. Any director worth the title can stay on top of things when the crew, talent, and equipment perform exactly as expected. But much of the value and respect that people place on directors depends on their ability to stay in control when, despite all the best-laid plans, things don't go as planned. A crew member or on-camera person may get sick, a key person may refuse to continue unless some special accommodation is made, a studio camera may go out, or a mic may suddenly fail. Vacillating, giving mixed signals, or not being able to make a decision at a crucial time can result in production paralysis. In large-scale productions everyone is typically working under pressure. Directors must be able to control their own tension and anxiety-not an easy task when they have responsibility for everything-while being sensitive to the differing abilities and temperaments of talent and crew. A heavy-handed approach with the wrong person can temporarily destroy that person's effectiveness and turn a bad situation into a disaster. Conversely, a mealy-mouthed approach that elicits no respect or leadership ability can be just as bad. The director's first production task will be to requisition and bring together the equipment and crew he or she needs.
|
|
Requisitioning Equipment and Facilities The first step will normally be to fill out a Facilities Request Form. Production facilities typically have forms tailored to their own needs and equipment.
Not anticipating a need may mean there will be last-minute delays in getting what you want. Worse still, you may even have to do without something you need, especially if someone else has requisitioned the equipment for the same time period. In addition to being used by the studio's Facilities Manager to plan on the necessary talent, crew, facilities, and equipment, the Facilities Request Form is used to anticipate production costs.
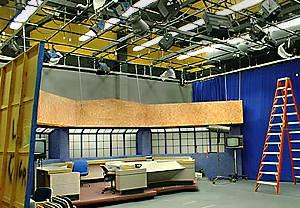
Even
though virtual sets are now being used
in many studios, the traditional hardwall and softwall sets are still the most
widely-used setting for studio productions. These are discussed
For every audio or video event that takes place during a production several behind-the-scenes production steps are typically required. Because production involves the activities of numerous crew members-the number can range from 6 to more than 60-the director's instructions must be clearly and succinctly phrased. Even the word sequence is important. If the director says, "Will you pan to the left and up a little when you 'lose [your tally] light' on camera one," all camera operators must wait until the end of the sentence before they know who the director is talking to; and then they must remember what the instructions were. However, if the director says, "Camera one, when you lose light, pan left and up a little," the first two words indicate who, the next four words tell when, and the last six words indicate what. After the first two words, crew members know that only camera one's operator is being addressed. This will get the attention of the camera one operator, and the rest of the crew members can concentrate on their individual tasks. The "when" in the sentence tells camera one not to immediately pan and tilt, but to prepare for a quick move once the camera tally ("on-air") light is off. This may involve loosening the pan and tilt controls on the camera's pan head and being ready to make the adjustment-possibly within the brief interval when the director switches to a reaction shot. Even a one- or two-second delay can make the difference between a tight show and one where the production changes lag behind the action. Although the specifics of the jargon vary between production facilities, directors tend to use some of the same basic terminology. To illustrate this, let's trace a director's PL line conversation to the crew for the opening of a simple interview show. This production uses two cameras, one of which moves from position
A to Since the guests on this show are different each week and will require different opening and closing announcements, only the show's theme music is prerecorded on a hard disk or audio tape. The slate and the opening and closing announcements are read off-camera, live. Before we get to the actual show, let's look at several things
that the audience will not see, but that are still important to the production.
Color Bars, Slate, Countdown Clock, and Trailer In professional productions there are four elements recorded on the tape that are not seen by the audience: 1 . First on the tape are
color bars These are used to set proper color balance and audio and video
levels for the videotape playback. The white level (note the white block) and the
primary (red, green and blue) and secondary (magenta, cyan and yellow) color bars
should register correctly on a TV screen and on a vectorscope. You will recall that
we explained how to set up your video monitor here. |
 On this form you will list such things as the production and rehearsal dates and
times, studio space needed, personnel required, and the number of cameras, video
recorders, and mics needed.
On this form you will list such things as the production and rehearsal dates and
times, studio space needed, personnel required, and the number of cameras, video
recorders, and mics needed. position
B. In position A the camera gets the establishing (wide) shot. In position B it
gets closeups and over-the-shoulder shots.
position
B. In position A the camera gets the establishing (wide) shot. In position B it
gets closeups and over-the-shoulder shots. for a minimum of 30 seconds accompanied by a reference level audio tone (generally
0dB) on all audio tracks.
for a minimum of 30 seconds accompanied by a reference level audio tone (generally
0dB) on all audio tracks.|
Depending on the facility, this information will vary. The slate shown above shows the time code numbers that are being encoded on the video. Network requirements typically specify a start code of 01:00:00:00 for the first program on a tape. After these, there is typically an electronic countdown clock that starts at 10 seconds and goes to 2 seconds. 3. At this point there should be exactly two seconds of black and silence before the program begins. This precise timing makes it possible to roll a tape on a particular number and then "punch it up" at the exact moment it's needed. With non-tape recordings this gives the operator a warning that the beginning of the program is at hand. However, since this type of recording can start instantly, the playback is generally paused on the first second of video. 4. At the end of the production, network specifications require five minutes of black and silence with continuing time code after the last scene (generally the closing credits) of a production. Now let's trace the director's dialogue for the first minute or so of a very basic interview show. Here we're assuming an on-camera slate and that videotape is being used to record the show.
Excluding the commercial, all of the above takes less than a minute of production time. At the end of the show, the opening wide shot on camera one can again be used. During the 30 seconds or so that the interviewer uses to wrap up the show, camera one can truck right to the mid-position and zoom back. This shot can be used (possibly with dimmed studio lights) as a background for the closing credits and announce. Even though this example is a bit of old-fashioned in its format, it illustrates all the things the director is concerned with "behind the scenes" (and it represents a good starting assignment for laboratory exercises).
Note the constant use of the terms "ready" and "standby" in the director's dialogue. During a production, crew members are normally thinking about or doing several things at once-including listening to two sources of audio: the PL line and the program audio. "Standbys" warn them of upcoming actions.
But if the director simply blurts out, "Take one!" when the cameraperson is not ready, the audience may see a picture being focused, complete with a quick zoom in and out. Since no "standby" warning was given, the director can hardly blame the cameraperson.
Although the studio director can relay signals to the crew via headset (PL line) instructions, getting instructions to on-camera talent while the mics are on must be done silently through the floor director. To do this the floor director uses agreed upon hand signals. In order for the talent to be able to easily and quickly see these signals, they should be given right next to the talent's camera lens. The talent should never have to conspicuously look around for cues when they are on camera Photos of the various
Profile shots (equivalent to shooting the closeups from camera position A) often hide these important clues. A closeup of the guest from camera position B, as well as a closeup of Dr. Lee from the camera 2 position, provide much stronger shots. These angles also offer more possibilities for shots. You have a strong closeup of the person talking, plus, if you zoom back slightly, an over-the-shoulder shot that can even be used to momentarily cover comments by the person whose back is toward the camera.
An essential talent for a director is the ability to react quickly to changes in action. But "react" implies delay. In fact, the total reaction time is equal to the accumulated time involved in recognizing the need for a specific action, communicating that action to crew members, having them respond, and then telling the technical director what you want done (for example, cut to camera #1). That can represent a delay of several seconds. Although that may not seem long, when audiences are used to seeing production responses in sync with on-camera action, it will clearly reveal that the director is lagging behind the action. The solution is for the director to try to anticipate what's going to happen. During an interview, a director should be able to sense when the interviewer's question is about to end, or when an answer is winding up. By saying "stand by" early and calling for a camera cut a moment before it's needed, a director will be able to cut from one camera to the other almost on the concluding period or question mark of the person's final sentence. Also, by watching the off-air monitor in the control room, as opposed to the on-air shot of the person talking, the director will often be able to see when the off-camera person is about to interrupt or visually react to what is being said. Using these clues, a good director can almost appear to have precognitive powers!
Under this heading we'll cover makeup, hair, jewelry, and wardrobe.
Back in the days of low-resolution black-and-white TV, facial features had to be somewhat exaggerated, just as they do now on the stage. However, in this day of color and high-resolution video, this type of exaggeration would look a bit clownish. Today, makeup is primarily used to cover or diminish facial defects, fill in deep facial chin clefts and "five o'clock shadows" on men, and to take the shine off faces. In the case of women, judiciously-applied "street makeup" is generally adequate for limited on-camera exposure, such as interviews. However, when professional talent need to appear at their best
under different lighting conditions and for long periods of time, things can get
a bit more complicated. For this reason, we've elected to cover makeup in much
more detail
Again, for limited on-camera appearances, no special changes need to be made from normal hair styling. Stray hairs have a way of calling attention to themselves when close-ups are illuminated by backlights, so hair needs to be kept in place. When applied to hair, oils and creams can impart an undesirable patent leather-like shine, which will be exaggerated by backlighting. The absence of hair-i.e., bald heads-may need help from a powder base carefully matched to skin tones. Backlights and blond hair, especially platinum blond hair, will
cause video levels to exceed an acceptable brightness range, so backlight intensity
will need to be dimmed or the beams barned off. (It is also possible to alter When it comes to the effect of backlights and even lighting in general, camera shots and lighting should be carefully checked on a good video monitor before a production.
Jewelry can represent two problems. First, if it's highly reflective, the results can range from a simple distraction to the creation of annoying trailing streaks in the video. The simplest solution is to either substitute non-reflective jewelry, or remove it all together. If this isn't an option, dulling spray can be considered, assuming the talent doesn't mind having their jewelry sprayed in this way. Dulling spray should come off with cleaning, but before you use it, especially with expensive jewelry, you will want to make sure there are no lasting effects. The second problem is noise. Although an overhead mic may pick up a bit of sound when such things as necklaces move around, this slight bit of noise can turn into very annoying distraction if the jewelry comes in contact with a personal mic.
In general, clothes (wardrobe) that are stylish and that flatter the individual are acceptable-as long as five caveats are kept in mind.
We'll move from the studio into the TV control room in the next module.
|
 read by an announcer. (Some slates are now electronically generated.)
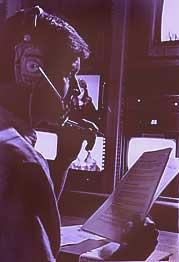
 They also protect
the director. If a "standby" is given in reasonable time, the director has every
right to expect the crew member involved to be prepared for the requested action-or
to quickly tell the director about a problem.
They also protect
the director. If a "standby" is given in reasonable time, the director has every
right to expect the crew member involved to be prepared for the requested action-or
to quickly tell the director about a problem. merger,
but adjacent Caucasian skin tones can appear unnaturally light, even chalky.
merger,
but adjacent Caucasian skin tones can appear unnaturally light, even chalky.